REFLECTIVE PRACTITIONER BRIEF


- REFLECTIVE PRACTITIONER:-
- OUTCOMES
- 1. Engage in continuous reflection, evaluating skills gaps and producing personal reviewplans ONGOING
- 2. Build a portfolio of evidence to support on-going professional and academicdevelopment.
- A). Create a ‘Pecha Kucha’ (20x20) slide presentation about your life so far andexplaining your reasons for studying photography. COMPLETE
- B). Build an in detail Curriculum Vitae including a personal statement. COMPLETE
- C). Create a letter of application for a job within the photography or allied industries COMPLETE
- 3. Apply key transferable and professional skills related to working within the creativearts sector to own working practices COMPLETE
- 4. Apply correct health and safety judgements to working situations COMPLETE
- 5. Utilise support networks and bodies available to sector specialists COMPLETE
_____________________________________
Outcome 1
Sat 26th Jan
- Complete first draft of 2500 word essay by the end of this weekend. FIRST DRAFT COMP.
- Complete first draft of 2500 word essay by the end of Feb..... COMPLETE
- Come up with a subject for the Blackburn Brief. COMPLETE
- BLACKBURN BRIEF:-
- Blackburn brief, FireStation. Awaiting go ahead from Crew Manager Steve Orm. Possible commencement March 2019 GO AHEAD GIVEN. AWAITING PHOTO PRINT
- STUDIO MODULE:-
- Book studio for final full length photographs BOOKED WED 27th FEB
- On receipt of ordered mirrors, add film still life to portfolio. COMPLETE
- Order presentation boxes. COMPLETE
- Two totally different head and shoulders COMPLETE
- Three totally different, full length. one down, two to go. COMPLETE
- Book studio for full length pics using multiple light sources. COMPLETE
- Two still life, mixed lighting, flash and continuous. COMPLETE ADD TO
- Three still life using 35mm film COMPLETE ADD TO
- Blog about last roll of black and white for studio brief COMPLETE
- INDUSTRY:-
- Begin on Tuesday 12th ongoing. COMPLETE
______________________________________________________
TO BE COMPLETED BY FRIDAY 1st FEB
- Complete. 20 x 20 presentation for Richard Peregrine. COMPLETE
- Complete blogging Monday 29th Jan P. Grace Contextual studies lecture. COMPLETE
TO BE COMPLETED BY FRIDAY 8th FEB
- Begin photographing Blackburn brief ONGOING
- Complete blogging Monday 4th Feb M. Pearson Contextual Studies. COMPLETE
- Complete Review of Semester one performance.COMPLETE
TO BE COMPLETED BY FRIDAY 23rd FEB
- Complete still life 35mm film part of studio brief. COMPLETE
- Blog outstanding contextual studies lecture. COMPLETE
TO BE COMPLETED BY FRIDAY 30th FEB
- Build an in detail Curriculum Vitae including a personal statement COMPLETE
TO BE COMPLETED BY SUNDAY 10th MARCH
- 5. Utilise support networks and bodies available to sector specialists COMPLETE
TO BE COMPLETED BY SUNDAY 17th MARCH
- Job application COMPLETE
TO BE COMPLETED BY SUNDAY 13th APRIL
- Industry COMPLETE
- Studio COMPLETE
- Contextual studies COMPLETE
____________________________________________________________________
DIARY
Friday 1st Feb
Blackburn brief. Blackburn Fire Service
Met With Steve Omar at Blackburn Fire Station today.
Emails from Blackburn Fire Station, Crew manager
|
13:57 (4 hours ago)
| |||
| ||||
Hi Ian.
Let me know you have got this email please.
Nice to meet you both today.
I’ll be in touch
Steve Omar
Crew Manager
Blackburn Fire Station.
========================================
_______________________________________________
Tuesday 5th Feb
Completed PechaKucha.
Wednesday 6th
Contextual studies blogging.
Thurday 7th
Reflective practitioner blogging
Email Sam for studio available dates COMPLETE
________________________________________________
Monday 11th
Shot 35mm film for still life and developed for printing tomorrow
Tues 12th Feb
Printed 15 negatives.
Wed 13th
Picked up dry prints
Thursday 14th
Scanned all prints to blog later
Friday 15th
Went to Chorley Fire Brigade Training centre to take photographs of 1956 Dennis fire engine.
Edited photographs and blogged on Blackburn brief page
Saturday 16th
Blogging
Tuesday 19th
Studio brief
Wednesday 20th
day off
Thursday 21st
day off
Friday 22nd
Research studio shots for Wednesday shoot. (full length, for studio brief).
Saturday 23rd
Finish contextual studies blog (ab-ex and colour field artists)
Monday 25th
Work on CV
Wednesday 27th
Model shoot in studio for full length studio brief
Thursday 28th
Edit above pics and critique
Monday 4th, severe stress symptoms....decided to take a break.
Friday 8th
Back to it, complete CV and update on blog.
Saturday 9th
Photographic institutes blog
Tuesday 12th
Fire station shoot called off due to Station being on flood alert.
Wednesday 13th
Take up Space Project meet at Blackburn Museum.
Thursday 14th
Complete job application.
Start Industry module
Friday 15th
Take up space Manchester Museum trip.
Severe stress symptoms during day. Spent the evening in A&E.
Take it easy over the weekend.
Saturday 16th
Trip to Bradford |photography ,museum
________________________________________________
Tuesday 19th
NEC Birmingham Photography Show


 The above photographs had to be taken quickly with a basic on-camera flash as the models were from independent make up artists and not available to pose.
Thursday 21st
Take up space, Workshop at 'Making Rooms' Blackburn.
Corporate shoot, helping out fellow student, Sue Trafford.


Friday 22nd March.
Take up space trip to NOMA Project. Manchester
Sunday 24th March
Take external shots of Blackburn Fire Station.
Monday 25th
last lecture
Tuesday 26th
Pecha Kucha
Wednesday 27th
Take up Space. Workshop 4
Work on industry
Saturday 30th March
Take up Space, Blackburn market Hall
Monday 1st April
All day studio with Model Dr Alweena Awan
Thursday 4th April
Work on Studio brief from Alweena shoot.
Friday 5th April
Studio brief
Tuesday 9th April
Finished essay, printed and bound. Handed in to turn it it.
Saturday 13th April
Fire station breathing apparatus shoot
Sunday 14th April
Work on Blackburn brief
Wednesday 17th April
Send studio pics for print
Work on Blackburn brief.
Complete Industry brief
Saturday 27th April
Take up Space workshop, Blackburn Museum
Tuesday 30th April
Retouching Workshop, Blog this demo.
Blog Take up space from Saturday
Blog Scanning for Print (B/W Negatives)
Saturday 4th May
Final Take up Space community get together before trips and work week
_______________________________________________________________

========================================
|
09:39 (4 hours ago)
| |||
| ||||
Good Morning Ian.
Good news sir, you have been given the green light.
Here is a copy of what the service will need from yourself as requested by our corporate comms dept
“They will obviously need to get consent from anyone who is identifiable in the images and if they could add a clause in on our behalf that would allow us to also use the images, that would be ideal. I’d suggest:
For use by Lancashire Fire and Rescue Service to publicise the Service’s work in terms of prevention, protection and response including campaigns, recruitment and raising the profile of the Service internally and externally. This includes printed and digital materials and in the media.”
So we can push this one forward and hopefully meet on the 12th and 13th March as mentioned below. Can you draw up some consent forms for our staff to sign to say that they have no problems with appearing on the pics. Also include the above clause on the consent form so the service gets something from it. When signed I can copy them and give 1 to you and one for me.
We have a training session booked in for each morning although we won’t know what we will be doing until the day, but it will definitely involve crews using equipment.
I hope this helps you out.
PS I think the Dennis is at Fulwood station. Feel free to telephone the station to make enquiries 01772 866981
See you soon
Steve
==========================================
|
12:13 (2 hours ago)
| |||
| ||||
I’ve sent this off to our corporate comms dept for approval Ian.
Great pics, looking forward to seeing our team plastered all over Blackburn Uni ha ha
See you next month.
Steve
From: Ian Fletcher [mailto:iansfletcher@gmail.com
Sent: 16 February 2019 11:10
To: E71 - Omar, SteveSubject: Re: Photography students
_______________________________________________________________
 ________________________________________________
Sent: 16 February 2019 11:10
To: E71 - Omar, SteveSubject: Re: Photography students
_______________________________________________________________
|
Thu, 14 Mar, 22:59
| |||
| ||||
Evening Ian.
Here are some dates for you.
20th & 21st March
28th & 29Th March
5th & 6th April
13th & 14th April
21st & 22th April
7th & 8th May Tuesday and Wednesday
15th & 16th May Wednesday and Thursday
23th & 24th May Thursday and Friday
These are the dates we are on duty for a day shift 0800hrs to 1800hrs.
If you can let me know when you will be available please, then I can book you in.
Thanks and speak soon
|
Sat, 30 Mar, 19:40 (6 days ago)
| |||
| ||||
Hi Ian.
You are booked in for 10 o’clock on the 13th April.
We will be practising using our Breathing Apparatus in the Fire house so the action shots should be good. This will start about 10:15 to 12:30.
You will have an opportunity for close ups and distance shots and you may need some form of lighting.
I have produced the model release forms and will give them out on the day.
If we are not on station when you arrive, then that means that we are at a fire. Try to telephone me to make contact and I will let you know the how long we will be. If I don’t answer it will be because we are too busy and the session will need to be postponed.
Hope this is ok
See you then
_______________________________________________
Tuesday 5th Feb
Completed PechaKucha.
Wednesday 6th
Contextual studies blogging.
Thurday 7th
Reflective practitioner blogging
Email Sam for studio available dates COMPLETE
________________________________________________
Monday 11th
Shot 35mm film for still life and developed for printing tomorrow
Tues 12th Feb
Printed 15 negatives.
Wed 13th
Picked up dry prints
Thursday 14th
Scanned all prints to blog later
Friday 15th
Went to Chorley Fire Brigade Training centre to take photographs of 1956 Dennis fire engine.
Edited photographs and blogged on Blackburn brief page
Saturday 16th
Blogging
Tuesday 19th
Studio brief
Wednesday 20th
day off
Thursday 21st
day off
Friday 22nd
Research studio shots for Wednesday shoot. (full length, for studio brief).
Saturday 23rd
Finish contextual studies blog (ab-ex and colour field artists)
Monday 25th
Work on CV
Wednesday 27th
Model shoot in studio for full length studio brief
Thursday 28th
Edit above pics and critique
Monday 4th, severe stress symptoms....decided to take a break.
Friday 8th
Back to it, complete CV and update on blog.
Saturday 9th
Photographic institutes blog
Tuesday 12th
Fire station shoot called off due to Station being on flood alert.
Wednesday 13th
Take up Space Project meet at Blackburn Museum.
Thursday 14th
Complete job application.
Start Industry module
Friday 15th
Take up space Manchester Museum trip.
Severe stress symptoms during day. Spent the evening in A&E.
Take it easy over the weekend.
Saturday 16th
Trip to Bradford |photography ,museum
________________________________________________
Tuesday 19th
NEC Birmingham Photography Show


Thursday 21st
Take up space, Workshop at 'Making Rooms' Blackburn.
Corporate shoot, helping out fellow student, Sue Trafford.


Friday 22nd March.
Take up space trip to NOMA Project. Manchester
Sunday 24th March
Take external shots of Blackburn Fire Station.
Monday 25th
last lecture
Tuesday 26th
Pecha Kucha
Wednesday 27th
Take up Space. Workshop 4
Work on industry
Saturday 30th March
Take up Space, Blackburn market Hall
Monday 1st April
All day studio with Model Dr Alweena Awan
Thursday 4th April
Work on Studio brief from Alweena shoot.
Friday 5th April
Studio brief
Tuesday 9th April
Finished essay, printed and bound. Handed in to turn it it.
Saturday 13th April
Fire station breathing apparatus shoot
Sunday 14th April
Work on Blackburn brief
Wednesday 17th April
Send studio pics for print
Work on Blackburn brief.
Complete Industry brief
Saturday 27th April
Take up Space workshop, Blackburn Museum
Tuesday 30th April
Retouching Workshop, Blog this demo.
Blog Take up space from Saturday
Blog Scanning for Print (B/W Negatives)
Saturday 4th May
Final Take up Space community get together before trips and work week
_______________________________________________________________
Evaluation Semester One
Outcome 1
RESEARCH METHODS. FEEDBACK AND GRADES
RESEARCH METHODS. FEEDBACK AND GRADES

Reflection on grades
Coursework
Having not copied or pasted any text for any of the studies, be it research or contextual, I am disappointed with the grade received, and feel i could have taken an easier route as none of this work has been checked for plagiarism, that I am aware of. I don't understand the comment about font's as, as far as I am aware, the same font exists throughout, with the exception of Quotes. We have all raised issues about the problems with Google Blogger as a format and its User Friendliness leaves a lot to be desired, leading to tutor remark's , along the lines of, 'I don't care what it looks like, as long as its there'. Evidently, this is not the case?
Project
What seems to be a satisfactory report is marred by a reference to non explanation of depth of field. On at least four occasions, I mentioned the depth of field setting to clearly demonstrate an understanding of this particular setting. I have shown modified lighting that i had to explain again in a recent show and tell, so this was also obviously overlooked. Once again I felt the grade was below the effort put in.
Strengths
Fulfilling the outcomes as requested.
Weaknesses
Not fully understanding the reasons for the grade given.
Opportunities
no idea
Threats
I am pretty aware of what i am, or am not capable of, and thoroughly understand my weaknesses. But I have to admit, if I think that I am being underestimated, I find that hard to accept without a full and concise reason, or explanation. There is a common belief that any unsatisfactory grade will spur on a good student to do better, and a good grade would give confidence to a student needing encouragement. I don't hold to this opinion. Bottom line is, for whatever reason, I'm not happy with the grades and I endeavour to just carry on and frankly forget them or they will just bother me. Its a weakness I am fully aware of. I do not have a problem with constructive criticism, but i do have a problem with myself if I feel the criticism isn't fully justified.
Semester one timetable

Evaluation Semester One cont.
Semester one. Research Methods Brief


________________________________________________________
Outcome 1
Task One Assessment.
As our first task, this was, at first a bit daunting. It opened up a whole new world of finding things out and looking things up that was totally new to me. Usually any research I would have done in the past would be looking through and understanding technical manuals of electrical and electronic equipment, which was usually of a more tangible nature. In this first task I have gained an understanding of the differences between qualitative and quantitative research and am therefore better equipped to do research of my own.
Having no previous idea of the exact ethics of photography, apart from common sense, e.g. not standing outside a school playground photographing random children or using flash photography to photograph rare works of art in a museum.
Strengths
As a camera is just another piece of technical equipment, I found the theory and practical side of its components, and also the technical terminology in its menu structure, more of an easy interest than a difficult hill to climb. Also I find it easier to remember the more technical details of photography.
Weaknesses
I find it hard to remember names and dates. I find if the names and dates apply to activities that I actually undertake, for example, The Contextual Studies Proposal, then I am more likely to remember such details.
Opportunities
To become accustomed to research at a level 4 educational standard.
Threats
Coping with a whole new philosophy and style of education.
Task Two Assessment
Once a theme was decided upon, it was clear what i was going to do and the photographs I intended to make. In my case, a study of the work of Edward Weston. During the process I also gained knowledge of the period of time in which Weston worked and the movement's he was involved with.
Task Three Assesment
Research into practice methodology was a concept I had to research in itself, mainly to understand the terminology, which is of an academic nature and not what one is used to in my familiar world of electrical engineering. Once an understanding of the academic terminology is understood, it becomes apparent what is being asked for.
Strength's
Having 'O' levels in English literature and English language, I find I have some ability to communicate through the written word. In some cases, easier than talking to people.
Weakness's.
As I have not had the opportunity to use any of the writing skills I may have obtained during my youth, I find the flow of my writing is easily halted by not being able to find the correct verb or adjective to convey my thoughts as well as I once could.
Opportunity
Of course. This sojourn into the world of academia could go a long way to apply some sophistication to my otherwise working class demeanour.
Threats
Having suffered and been hospitalised because of depression, anxiety and stress, I have to be careful not to overthink everything. This kind of pressure is very different from the pressures of my previous work. Things such as pricing, handling skilled labour and being set certain costs and times restraints can be much more hostile though. This is a different animal, yet I am quite vigilant about how it may affect my stress levels.
Task four Assessment
Outcome 3
After first deciding to do Macro photography for this assignment, a discussion with Martyn made me consider what the photographs would be about. As the common theme seems to be either insects or 'pretty' pictures of small objects with nothing but the intention to create aesthetically pleasing images without substance. More thought went into this, and i came up with the idea of documenting the care of animals in a zoological surround. The 'about' theme was to discover how any animal, large or small, can be homed in such a way, that its natural urges and behaviour can be fulfilled. On reflection, this was quite an in depth project for my first photo shoot, and would also not be the easiest subject to travel back and forth to retake photographs'. After even more thought, the idea came up to emulate the work of Edward Weston, considered an icon of Modernist photography.
First task was to decide which photographs to emulate and to try and successfully recreate the lighting. Also, in my case, these photographs were to be made digitally as opposed to the Black and White Agfa Isopan film that Weston used.
I took a lot of pictures of different subjects like landscapes, nudes, still lifes, portraits, genre scenes and whimsical parodies but my favourite thing to do was to take highly detailed pictures in black and white.
Weston
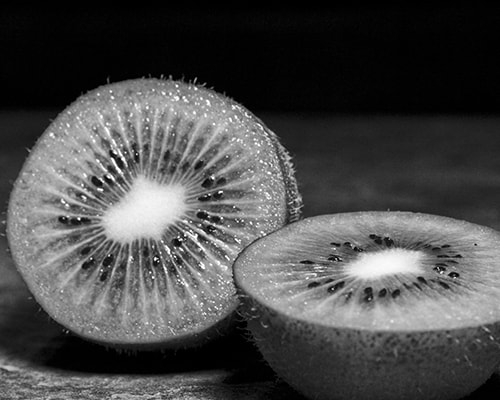
Weston 1930

Fletcher 2018, Final Photograph
In hindsight, a plate with no design may have been more effective. The pattern breaks the edges of the fruit itself being a slight distraction. I am happy with depth of fields. The lighting however could have been softer, even though it wasn't too dissimilar to that of Weston's photograph above.
Getting the lighting right took many attempts.

This image was over exposed, but the main objection was the composition. The fruit did not fill the frame and left open space to the front left and right. I felt that this just didn't look right. Also, a less decorative plate would have been less obtrusive.

Also too much empty space and though underexposed, the harsh light created hard shadows the were not pleasing to the eye,
A better understanding of different light sources and the way they produce different shadows can be gleaned from this exercise.

I was pleased with the tonal range in this photography and also the use of light that gave the photograph a totally black background. I considered a more central position but decided to move the object to the left creating some empty space to the right.
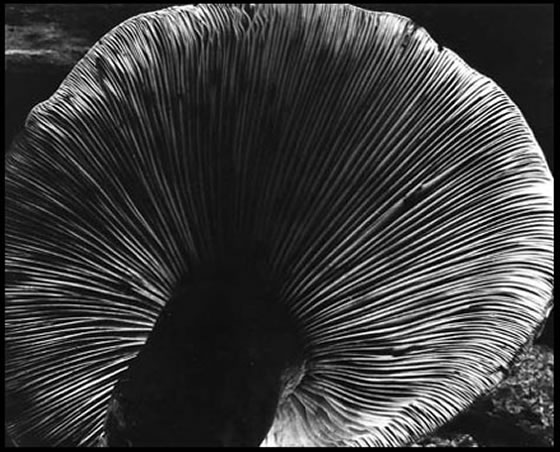
Weston 1940

Fletcher 2018
An attempt at capturing the mushrooms webs. I was happy with the way this eventually turned out, managing to get a soft edge to the light where the shadow falls on the fins. An extra light was used to bring up the shadows in this area.
I experimented with my own lighting modifications to get the light i wanted. As i did not have access to a small continuous light, i fitted a grid normally made for a snoot, to an led panel as shown

Also on this shot,

I fitted a piece of card to an led torch with a slot in it to create a light that did not spread so eliminating the exposure of the surrounding areas.

Strengths
An understanding of:-
Depth of fields,
Lens distortions at various focal lengths
Flash speeds and duration.
Shutter speeds appropriate for flash.
Flash sync and Hi Speed Flash sync (HSS).
Use of remote flash controls.
Basically a large understanding of the practical and technical aspects of a DSLR and its peripherals.
Weakness
Positioning lighting for optimum effect.
To translate what i want to achieve, lighting wise, into the practical application.
And having a bit more patience.
Opportunities.
To make use of the University studio to do still life photography in the company of the tutors.
Threats
Having to learn to communicate through the written word, but also being able to structure the written work in an orderly fashion, as certain opportunities and tasks arrive at different times. I do not work well under pressure or with people looking over my shoulder. But that mainly appertained to my old profession, when I actually knew what I was doing. Now I am in new territory, and obviously need professional tuition.
First semester, STUDIO assessment
Having quite an extensive range of photographic equipment already, I found the studio sessions to be easier to understand. Some of my own personal equipment has features that surpass that which is supplied by the University. Other equipment though is superior, i.e. heavy duty camera stands, universal spotlight and larger LED panels. Also the biggest advantage is space.
Strengths
An understanding of all the equipment in the sense of what it does and what it is for.
Weaknesses
I now need to use the equipment to take better pictures. In essence, one can learn all the moves made by individual pieces on a chess board, but, that doesn't furnish one with the ability to play the game.
Opportunities
Here, I have a chance to book the studio and play around with all the equipment to make more interestingly lit shots of models or still life.
Threats
Finding models to do the full length shots and portrait shots is not as easy as one would imagine at first glance. I need to look at more model shots for the full length studio shots
Overall opinion on research studies, Task 2, learning outcome 4
I spent many hours setting up and photographing the object's to emulate Edward Weston's Modernist approach to photography. I modified the lighting that I had, to create the lighting that I wanted. I looked at other photographers that had similar styles and eventually created the photographs for this brief. As far as I'm aware, I fulfilled this particular outcome and made reference to exactly how the photographs were taken and the camera settings being used, including the appropriate depths of field f stop setting and the results that such setting would produce. I was extremely disappointed with a 'C' when I feel that I could have taken on an easier subject that would just be a matter of photographing what is already there. I try to do the best I can and I have confidence in what I am attempting to do, even if it is not necessarily the right thing to do. I have never been one for guessing and hoping for the best, which can sometimes be frustrating when I do something that I believe to be right, but turns out unsatisfactorily. If I don't know something, I will ask. I like to understand things where possible rather than just learn parrot fashion, yet I find in-concise explanations frustrating. I have no objection to constructive criticism, but have trouble with subjective opinions.
___________________________________________________________
STRENGTH THAT MAY TURN OUT TO BE WEAKNESS'S
For many years I have taught myself many things. I am self a self taught drummer, guitar player, tattooist, decorator, fitter, welder, cable jointer, FLT driver, shopfitter,(some of these skills did not require the certificates as they do today due to the recent, strict, health and safety rules ). Also I am self taught in the use of cameras, namely DSLR's. Self taught, in Adobe light room and Photoshop. Self taught basic website building that does not require using templates etc and a number of other things. I tend to learn better when i find out for myself, which has always worked for me as I never had goals in the subjects that took my interest. It was always for my own education, knowledge and as a means to enjoy my hobbies. Now there is a goal, and my learning has to be more academic and structured which is something I have to accept, and get used to, to advance.
Semester one. Contextual Studies Brief

Strengths
Being able to understand fully Contextual studies lectures and enjoying learning about parts of history.
Weaknesses
I find it difficult to relate the subject of art and design to photography. Using photographic techniques it possible to experiment, for example, photograms, and Man Rays 'rayograms'.
But as a rule, a photographer photographs what is there, and may not have been influenced by the art and design movements, as painters and designers would have been?
Opportunities
I have slowly become accustomed to finding things out and stitching together timelines to make sense of all my research.
Threats
Memory issues. I am much more likely to remember any technical issue's than name's and dates. I can remember what happened and certain events, especially if attached to a narrative, but have difficulty pinning down the year.
_________________________________________________________
First semester, PLANNING A PROJECT assessment
Strengths
Having an understanding of how a camera works appertaining to ISO, aperture,shutter speeds etc, I didn't find any problem with the task that involved these aspects of photography. It was interesting to do the tasks that concerned, e.g. the decisive moment, juxtapositions and visual irony. I was able to portray what each task asked for with maybe the exception of sport or wildlife, but this was purely down to opportunity.
I gave examples of photo techniques that so far have not been asked for such as :-
Dark and light exposure
Photographs with large areas of dark and light can be problematic.
 To expose the sky correctly, the foreground becomes too underexposed.
 When the foreground is exposed correctly, the sky becomes over exposed.
To remedy this, we can put a graduated filter in front of the camera to darken the sky as shown:-
 Here we can see the effect the filter has on exposure.
Another way is to take the two original pictures and compbine them to for an HDR (High Dynamic Range image that will take the best exposures from each shot. Done carefully, a very good result can be obtained. If its overdone, it can look a bit metallic.
 The above image combined to create a more uniform photography.


 Above, another example of using HDR to combine two images.
Fill flash
 In this example we have the same problem of a dark foreground. Instead of using HDR, I decided to use Fill Flash. Which is basically as it sound. To use a flash, to illuminate the dark areas to give what is considered a better, more realistic look than HDR.


Weaknesses
I feel the whole course is totally unstructured in any systematic fashion and this tendency to have work and tasks issued in such a way makes it hard for me to put things in any kind of order. I find the whole idea of the different pieces of information being copied into different overall headings to be totally alien to me, and I fear that the difference between my knowledge of the subject and the way i present it can be detrimental to any grade i may receive. It is not a system I am used to working in. Anything that overlaps in my opinion should come under one overall heading and not be inserted here or there on a whim. It feels in some cases that everything appertains to everything else in some manner. Who is to say what is appropriate to be copied or not?
Opportunities and Threats
I have the opportunity to blog aspect of photography, on a technical level and also the workings of Light room and Photoshop. But where does one stop. I have already blogged about aspects of HDR, Rear curtain Sync and fill flash for example. I could go on and blog about other subjects such as focus breathing, or the circle of confusion, but none of this has been worthy of any addition to any grades and it is beginning to feel pointless. Its as though we are graded on how we think we are supposed to present our knowledge, rather than showing what we already know.
I am assuming as time goes on, I will get used to the way this course is structured and things will get easier to piece together.
I note that if an Electrical installation Critical Path Analysis was laid out in this way, some one would be getting fired.
________________________________________________________________
Outcome 4
Apply correct health and safety judgements to working situations:-
Health and safety in the studio
When using studio equipment, it is important to take health and safety into consideration. Equipment must be used correctly and in a way that will not cause injury to other people working in the studio environment.
Examples of safety practices.

Power and other cables are a main cause of trip hazards in a studio. Leads should be taped to the floor to prevent the possibility of a person tripping and causing injury.
Equipment must not be left lying around on the floor causing trip hazards and at the end of any session, all equipment must be put back in its designated space.


Damaged strobe bulb cover
Strobes, unlike speedlites have a modelling bulb as a source of constant light, as well
the flash bulb. The modelling light can become very hot and should be left to cool down after use
before fitting the plastic protective cover. This is to prevent personal injury from burns and melting bulb covers as shown above
Lighting stands must be erected and used correctly:-

Incorrect

Correct

To make the stand more sturdy, one can attach sand bags around the base.
To prevent any accidents or hazards all people in the studio (photographer, assistants, models) will comply with health and safety requirements. It is everyone’s responsibility to work safely and to take immediate action to prevent accidents and warn others of potential hazards and dangers so an incident does not happen.
Make sure the doorways and exits are marked clearly and not obstructed especially fire exits at all times. Everyone is familiar with the fire safety evacuation procedures.
Studio specific Health and Safety
Only people that need to be in the studio should be there.
In a studio environment the common major risks are:
Slips, trips and falls caused by people falling over equipment.
Issues concerning the use of electrical equipment Issues of manual handling, the lifting and moving of heavy equipment.
Issues concerning the use of electrical equipment Issues of manual handling, the lifting and moving of heavy equipment.
If in doubt about the use or safety of any of the equipment or health and safety ask the studio technician, support staff or the designated health and safety adviser for advice.
Hazards
Sharp Equipment
The use of scissors and utility knives are often required to cut cable ties, gaffer tape. When these are not in use they should be stored safely with blade covers on in a place where they will not be accidentally knocked.
The use of scissors and utility knives are often required to cut cable ties, gaffer tape. When these are not in use they should be stored safely with blade covers on in a place where they will not be accidentally knocked.
Suspended equipment Ensure all suspended equipment is securely fastened and where necessary with secondary safety chains to stop items falling e.g. suspended studio lights, heavy backdrops.
Above head height working Equipment or stored items that requires above head height working or, access to these items to be made by appropriate step ladders, kick-stools or scaffolding as necessary. The access to comply with agreed safe working practices e.g. Step ladders requires someone to hold and stabilise the ladders all the time someone is using the ladders.
Keep the studio clean, clear and un-cluttered. All the equipment in the studio is to be stored in the correct and safe way when it is not in use. Items to be stored in designated areas around the sides or outside of the studio, no equipment or empty boxes are to be left in walkways or places that people could trip over items.
Make sure all unused equipment is put away before you start your shot to minimise the equipment that could get in the way. Make sure all bags, boxes and equipment trunks are moved to a safe area at the side of the room so there are no trip hazards.
After the shot put all the equipment that needs to be put back away is safely stored.
Food and Drink is to be taken into the studio. This is to prevent food or drink being split destroying or damaging the equipment, giving electric shocks from the wires. Also food or drink on the floor could be a slip hazard. There is a possibility that photographic chemicals might be in the studio, if so they could contaminate food and drinks.
Tripods and Light stands Make sure all of the legs on tripods and light stands are pulled opened to give the greatest stability. This reduces the risk of equipment toppling over on top of someone or damaging the equipment.
Trailing wires and leads
All wires to be taped down or run through rubber cable floor trunking protector. This is to stop people tripping over the wires and hurting themselves. Also to prevent damage and ware to the cables that will shorten the cables life. It is good practice to tape the cable to the bottom of the stand, this is because if a cable is pulled it will tug the light at bottom of the stand so that it is less likely to be pulled over. Keep the use of extension cables to a minimum. If socket bars are used, check to make sure that the combined electricity is not exceeding the socket bars allowance.
All wires to be taped down or run through rubber cable floor trunking protector. This is to stop people tripping over the wires and hurting themselves. Also to prevent damage and ware to the cables that will shorten the cables life. It is good practice to tape the cable to the bottom of the stand, this is because if a cable is pulled it will tug the light at bottom of the stand so that it is less likely to be pulled over. Keep the use of extension cables to a minimum. If socket bars are used, check to make sure that the combined electricity is not exceeding the socket bars allowance.
When plugging and unplugging electrical equipment switch of both the equipment and the plug socket before putting the plug in.
Check all the electrical equipment is up to date with PAT testing. A visual check to be carried to ensure there are no exposed wires, damaged leads, plugs are firmly pushed into sockets, no cables are stretched and the equipment looks to be in good condition and works as designed.
Lamps Never touch lighting bulbs, even when cold. Incandescent lights work at high temperatures. If handled the finger marks and traces left behind can cause localised hot spots that will cause a bulb to blow, or even explode.
Make sure you give the studio lights plenty of time to cool down after use. The lights and the housings get very hot. You don’t want to burn your hands picking up something that is hot and then drop it. Hot lamps the filaments are also more fragile and prone to breaking if moved when still hot.
Any power packs are located immediately next to the light or in a position where it is least likely to cause a trip hazard.
Taking the studio, out of the studio
At certain times, one has to take studio equipment into a situation where members of the public are present. It is important to adhere to all health and safety measures. All lighting stands and tripods must be positioned as to not create a trip hazard for passers by and the situation must be governed at all times.

When using photographic equipment in a public place, of a model, for example, special care has to be taken to ensure the safety of, not only the model, but also of the people in the vicinity. A battery operated strobe can be used which negates the need for any trailing power leads. The shoot casn, if possible, be set up in a location where any access can be easily monitored, for example, no entry from the rear of the shoot. The photographer could also have an assistant monitoring any members of the public that may encroach on the set up. The light stands and tripods are to be opened correctly to maximise stability. The strobe can be fired by a remote trigger on the camera so that there will be no trailing leads between the camera and the strobe itself.
___________________________________________________
Booking form for studio which includes a risk assessment
A risk assessment is done to highlight any possibility of injury that may occur during a shoot, and whats steps are to be taken to avoid such an occurance.

___________________________________
______________________________
Studio brief Shoot Wednesday 27th March


I decided as the model clothes were not at all colourful, this photograph was more suited to black and white. The lighting on the legs is actually different on each leg and it would have been a better shot to make them more even, by moving the light boxes.. The floor and infinity curve need another coat of paint as the marks make the photo look very scruffy. Some of the bigger marks could be photoshopped out, but to smooth out all of the background would be a mammoth task.

With the two side lights still in place an additional soft box was placed above, and in front of the model as shown

This softbox at the front had its power adjusted to fill the shadows on the front of the model. If this was too bright it would probably take away any texture created by the side lights and would result in a 'flat' image. Two large panels were placed so as to shield the camera from any spill light which may emanate from the two side soft boxes.

With the same lighting set up the models legs have been slightly highlighted to make them more three dimensional. This also applies to the highlights on the shoes. Once again, the floor of the studio was very marked and I decided to clean up some of the worse scratches and scrapes in Photoshop. I also removed the labels that were still on the soles of the shoes as they were stuck firm.


This photograph was taken from an angle and distance which also showed the carpeted floor of the studio and the ceiling. This photograph, being digital, can be cropped in Photoshop. As below.

The point being, if the shot was framed like this in the first placer, then post cropping would not have been necessary. Though even in the days of film, cropping was still an option. For example:-
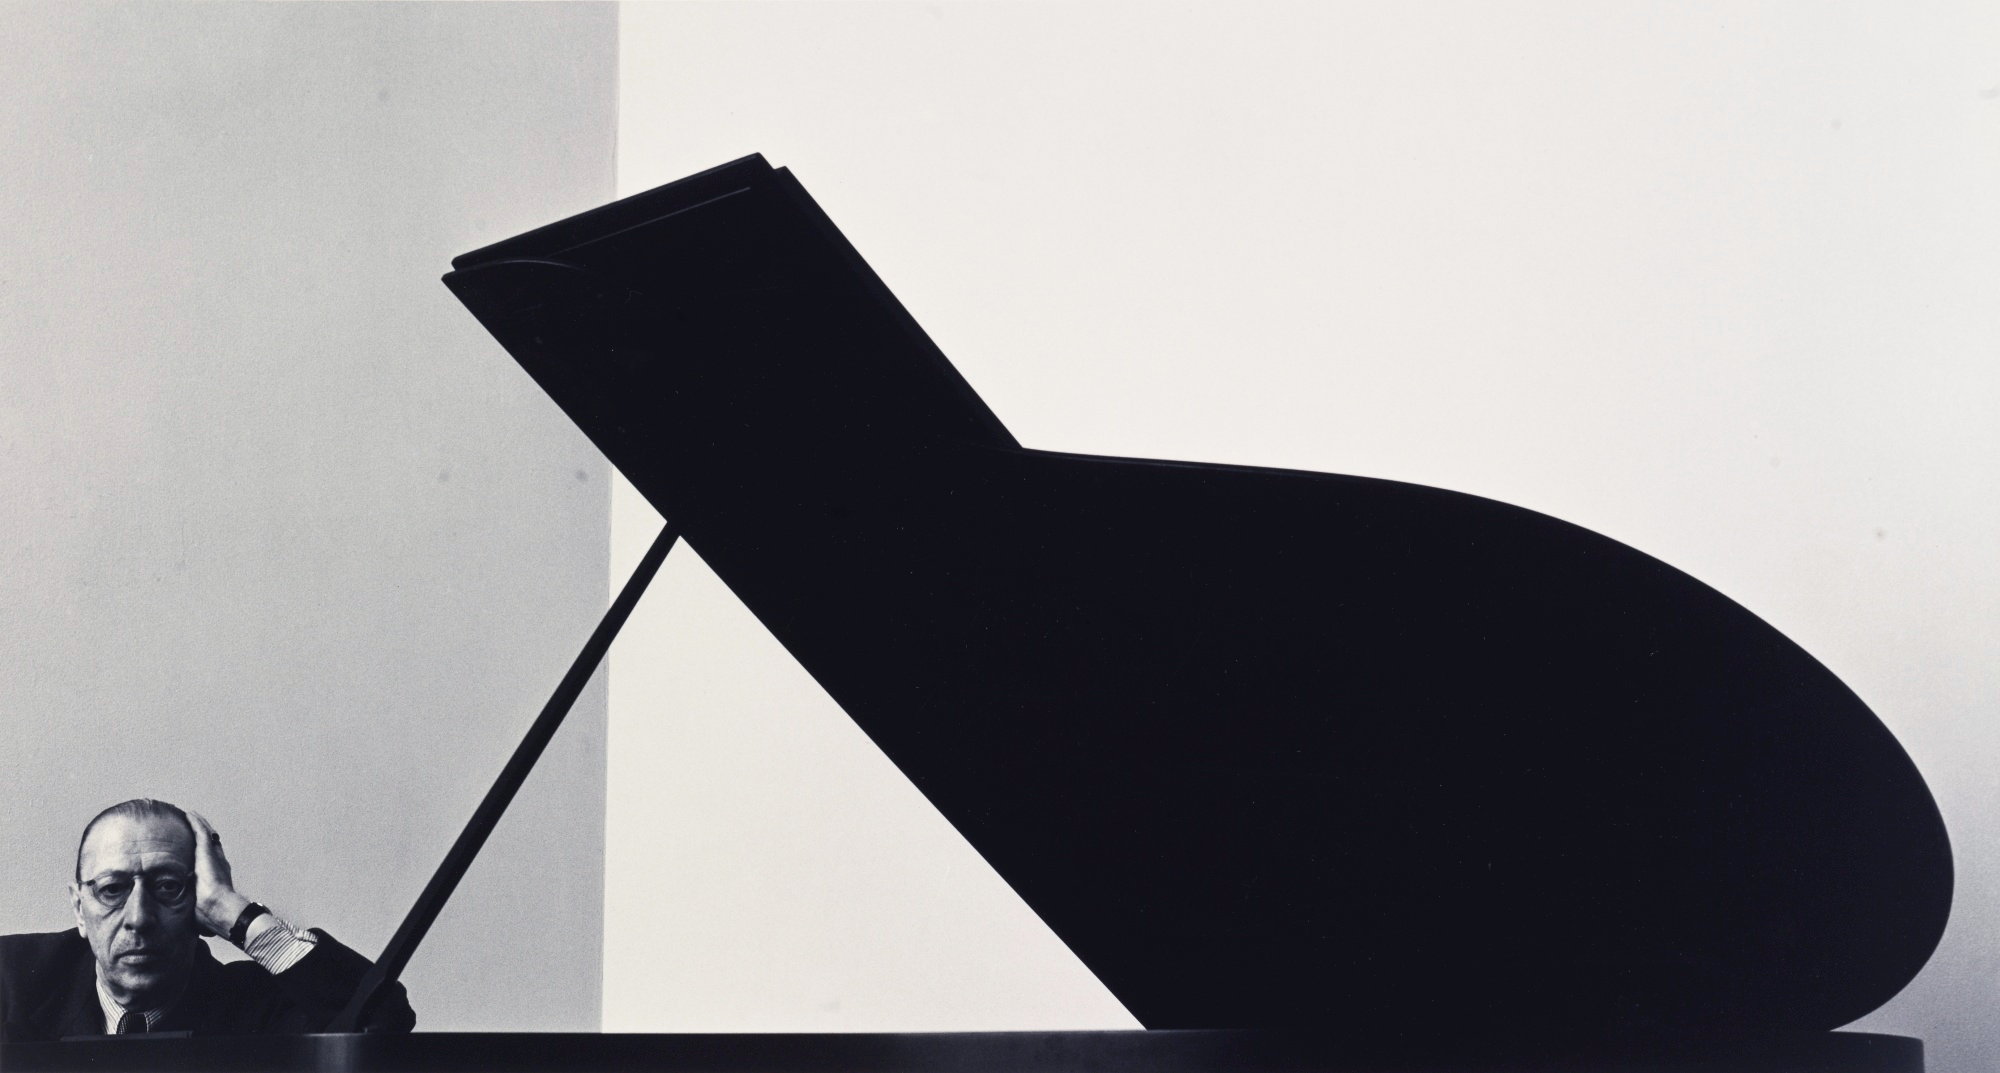
This noted photograph By Arnold Newman of Igor Stravinsky was cropped from the below contact sheet, bottom row, third from left, where you can also see the studio ceiling and what looks like a music stand on the floor.
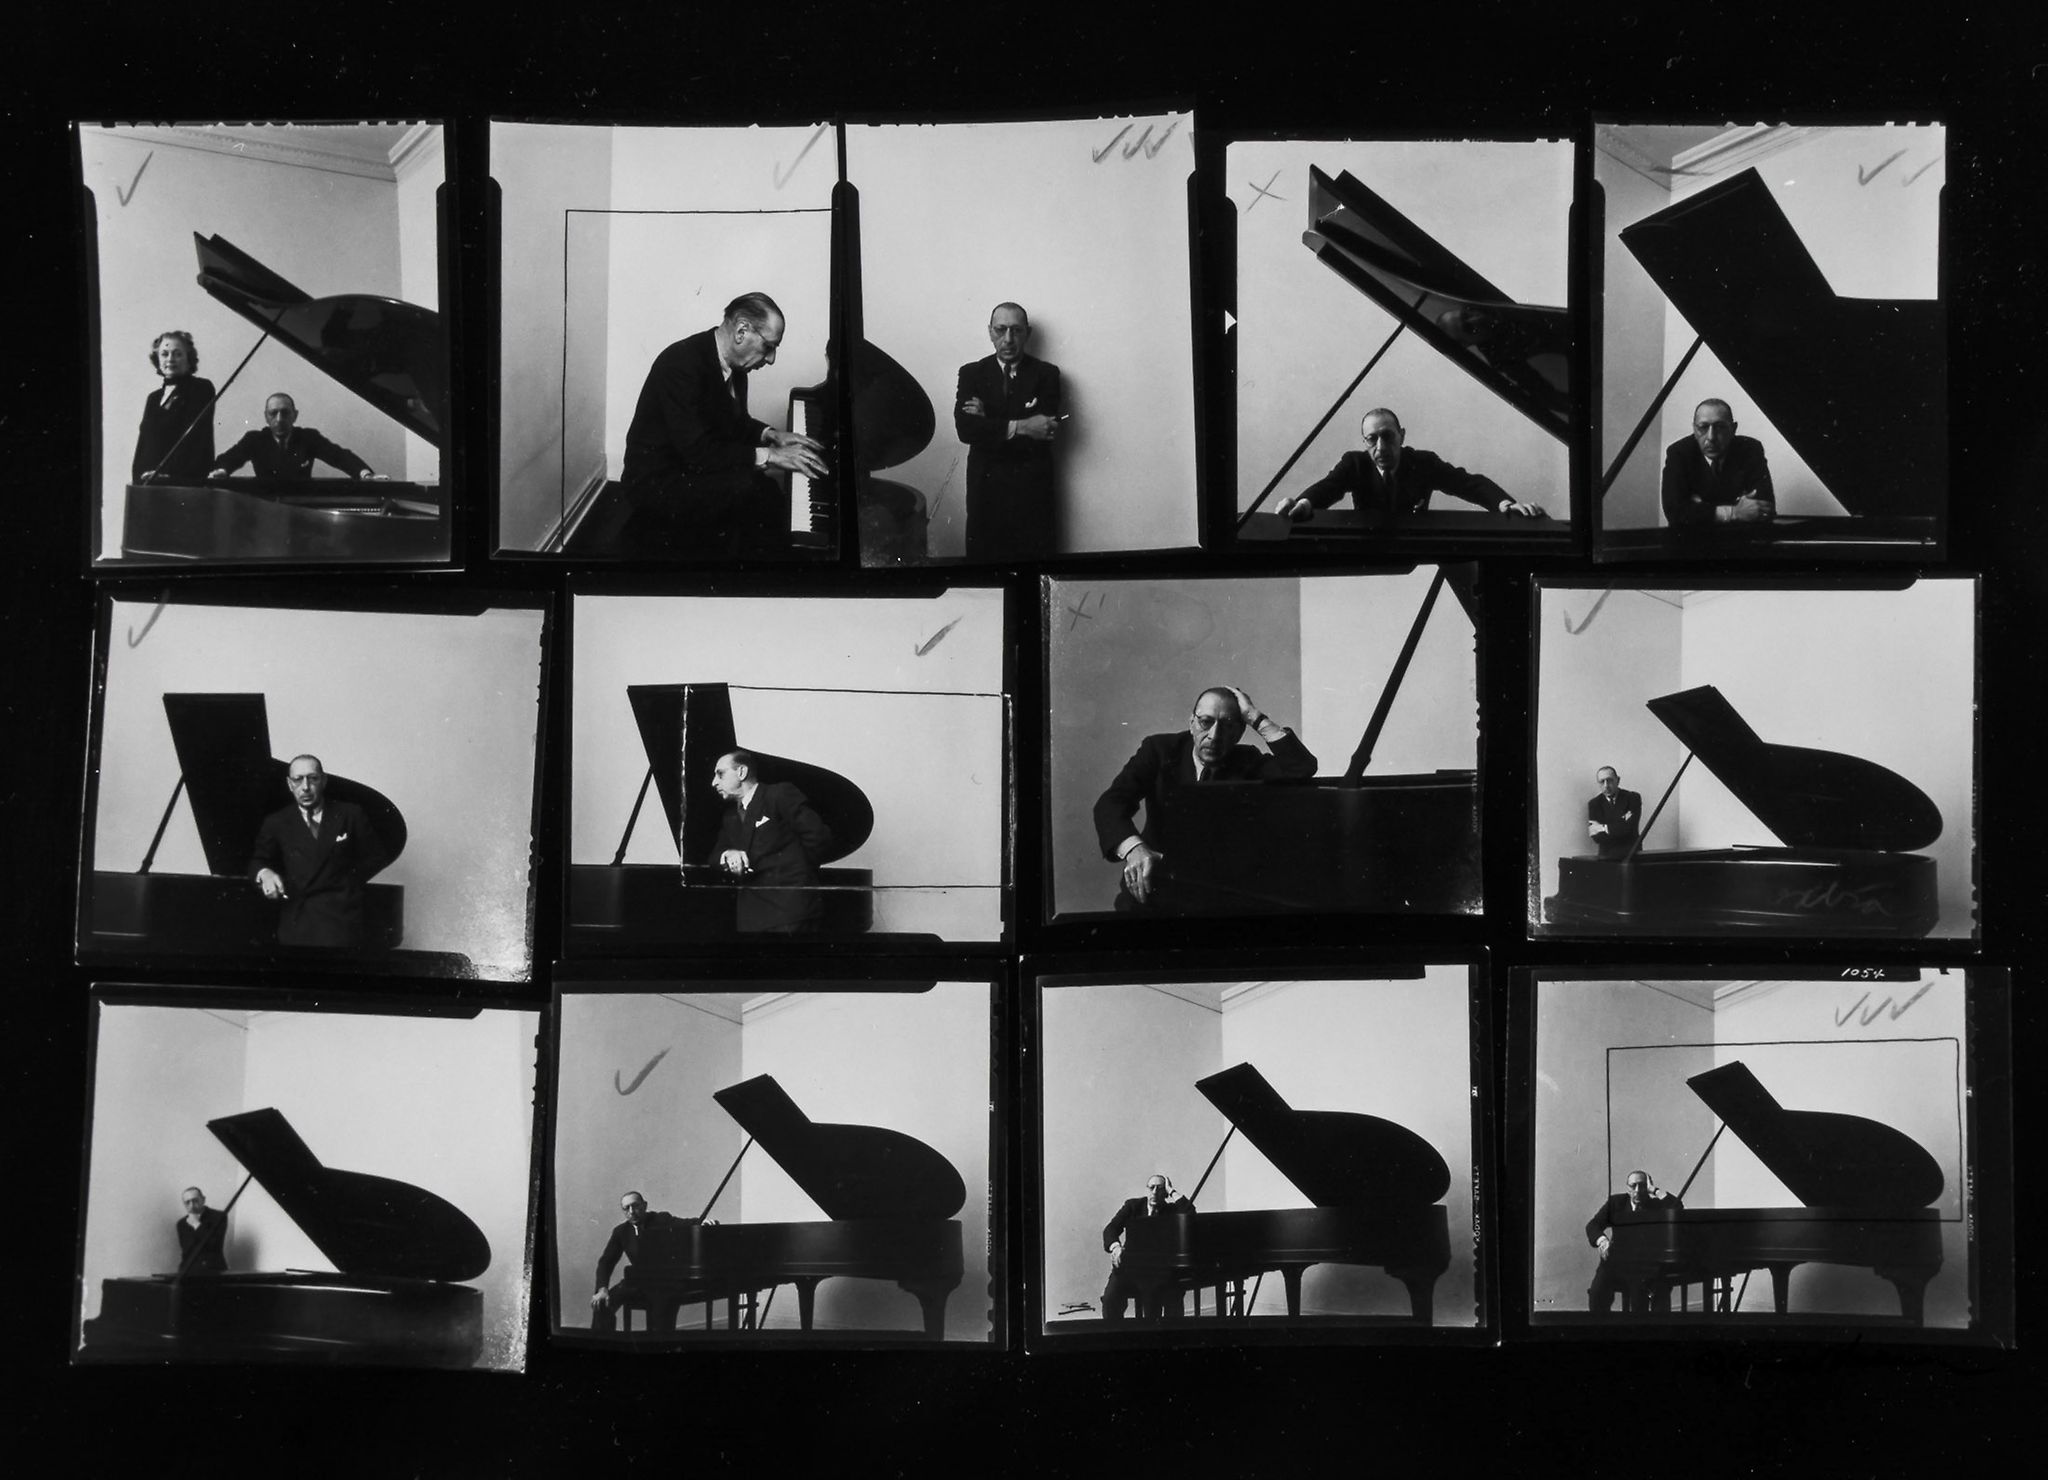
The actual crop:-


After considering the fact that other extraneous objects can sometimes make their way into photographs decided to purposely do so. I wanted to show the studio environment in a subtle way. I have purposely cut three corners with a studio light, the ceiling and the floor carpet. I find the white mark on the carpet slightly annoying and would definitely use Photoshop to remove it.

After a quick look, I found this picture of a supermodel taken for the Marie Claire magazine. Seems I was beaten to it.

This picture was taken using the one elongated soft box to the left and a snoot to cast light on the models face as shown below:-

I found, that though the snoot was acceptable, the softbox was set to too high creating unwanted highlights on the models raised right hand and the right side of her face.
PechaKucha
Outcome 2A

Minehead 1965
At the caravan
park with Mother and Brother

Dad’s accident
1973.
Lower Darwen derailment, Christmas 1973

New
Era
1975
1975
Some of the gang at the new Era youth club, Accrington.

Blackpool
1978
1978
Playing Apache on talent night, with the resident band
at Newton Hall Caravan park.

Laura Ashley,
Newtown, Wales 1983
Taking a break from doing the electrical installation
at Laura Ashleys new factory
in wales

Karen and Dad
1984
The people I miss the most. Taken at our wedding
reception

Philip Glass
1990
Working on the control gear at Philips Glass, furnace
re-build in Simonstone.

Tattoo studio
2003
Tattooing the names of a friends children on her foot.

Tattooing 2004
Janet, my brothers girlfriend
with her new tat

2005
Father of the bride. Here with my youngest daughter
doing her bridesmaid duties.

2010
Karen passed away due to complications caused by lung
cancer. She was 48yrs old.

2012
Met Dot, who had an interest in photography which reinitialized my interest
and pandered to my creative side, or so I’ve been told.

My first Nikon
At the Yorkshire sculpture park with my rather old,
borrowed Nikon D50.
6.1 meg
Nikon DX Crop sensor

The Tres
Valles, France 2014
First outing with my new Nikon D7200 crop sensor
camera. Brilliant scenery to photography. Looking forward to taking my D810
skiing.

Norway 2015
The Fjords from above.
Taken with a Nikon D7200

Notable
Photograph 2014
Using photoshop and photographic techniques to create
‘oddball’ pictures.

Cheshire Life
2016
August entry in the 2016 Country Life Magazine.

Company of
Strangers. Llandudno 2017
Llandudno charity gig, august bank holiday, in aid of
the homeless.

2018
Becoming a Grandad. Little Noah just a week old.
________________________________________________
Why Photography?
I have spent my entire working life employed by companies working in the Electrical Contracting Profession. In over 30 years I would say my job satisfaction has been negligible. It has been more a means to an end, rather than something that I have endeared to in any way. Though my attitude to my profession may not have been ideal, it did not prevent me from being one of the most versatile electricians on the circuit, excuse the pun. There are many different avenues that an electrician can explore, from domestic, to industrial, to installation, automation, process control and the design and building of electrical control panels. Not to mention Telecommunications and networking systems. I was fortunate enough to be able to hold my own in any of these fields and because of this I was well known by many Electrical Engineering companies. I have been head hunted on numerous occasions and been offered perks to move companies. I was always the 'go to' guy if any technical jobs turned up where the electrician had to have a full understanding of Hi Spec wiring schematics and also installation skills.
Unfortunately the downside to all this was an amount of stress that was slowly doing me harm, culminating in a sever mental collapse at the age of 39. Due to other life events, i.e, becoming a widow 10 years later, I felt I did not have any control over my life.
I had been told many times by friends and family that I was creative and had talent? I'd never really considered it, even though at school I managed an 'O' level in Art. I learned to play drums and I learned to play guitar. I taught myself tattooing and about ten years ago, I rekindled a latent interest in photography. Basically, I did anything that was in my control. No demands were being made of me and I could learn at my own pace. I gave up tattooing as it was more trouble than it was worth. A few years later my wife, Karen passed away due to complication arising from lung cancer.
About a year after Karen passed away,I met Dot, who by chance happened to like photography. From then on, all our outings were accompanied by our cameras. I got more and more interested, to the extent that I purchased photographic editing software and began to learn from books and the internet, how to use it. I taught myself all the camera basics and even delved into some of the more sophisticated workings of the modern DSLR , such as, flash sync, HSS, circle of confusion, focus breathing and other matters not normally undertaken by snapshot photographers. I entered a few competitions and won a slot as the Autumn photograph in Cheshire Life magazines 2017 calendar. I also won two tickets to the 2018 Photography show at the Birmingham NEC in an online nature photography competition.
Around March 2018, I found myself single again and was looking at a bleak future. I had nothing to look forward to, no goals, no plans. I had the rock band, and I had my camera, and, of course the knowledge I had accumulated over many years, but it didn't mean anything. It didn't pay the bills, and it was basically just a hobby. It was crazy not to take what I have learned so far, and put it to good use. To finally do something that 'I' wanted to do. I should have done it years ago, but circumstance would not allow. Taking control of my life again, after being out of control, for so many years, was the obvious thing to do, and what better way than by doing something I've always enjoyed. Also, something that I knew a lot about too. Its time to use that creative nature that others apparently see in me, that I frankly, never did. I am aware at my age and due to life experience, I am not the inquisitive tech sponge, that I once was. I am aware that taking on a degree at my age could be one of the hardest things I have ever done, but only from a position of not quite understanding 100% what exactly is being asked of me. Being responsible for up to 20 skilled men doing a multi million pound installation still wins hands down on the stress front.
What photography has done for me is given me a reason to carry on. Maybe all those years of learning for the sake of my own personal interest will now begin to reap some rewards. The chance also to be at university and hopefully get a degree is something I would never have imagined happening.
I only wish I could tell my wife.
_____________________________________________________________________________


Outcome 2B
CV
Ian S Fletcher
|
10
Springhill Rd. , Accrington , England BB5 0EX ◾ Mob: 07976300763 ◾ iansfletcher@gmail.com
|
Professional summary
Skills
· Computers and electronics
|
· Critical thinking
|
· Mathematics
|
· Complex problem solving
|
· Operation monitoring
|
· Production and processing
|
· Quality-control analysis
|
· Mechanical
|
· Active listening
|
· Engineering and technology
|
· Time management
|
· Coordination
|
· Equipment maintenance
|
· Judgement and decision making
|
· Instruction
|
· Mathematics
|
· Physics
|
· Telecommunications
|
· Administration and management
|
· Communications and media
|
· Customer and personal service
|
· Coordination
|
· Mechanical
|
· Engineering and technology
|
· Equipment maintenance
|
Experience
Freelance Photographer 09/2015 -
Current
Self employed Photographer
- Accrington
· Take
pictures of individuals, families and small groups,
either in a studio or on location.
· Adjust
apertures, shutter speeds and camera focus based on a combination of factors,
such as lighting, field depth, subject motion, film type and film speed.
· Use
traditional or digital cameras, along with a variety
of other equipment, such as tripods, filters and flash attachments.
· Create
artificial light using flashes and reflectors.
· Determine
the images and picture composition desired, selecting and adjusting subjects,
equipment and lighting to achieve the desired effect.
· Scan
photographs into computers for editing, storage and electronic transmission.
· Test
equipment prior to use to ensure that it is in good working order.
· Review
sets of photographs to select the best work.
· Estimate or measure light levels, distances and the number of
exposures needed using measuring devices and formulas.
Foreman Electrical Contractor 09/1990 -
05/2015
D & S Engineering Facilities
- Clayton-le-Moors,
England
· Maintain
a current electrician' s registration or
identification card to meet governmental regulations.
· Connect
wires to circuit breakers, transformers or other components.
· Repair
or replace wiring, equipment or fixtures using hand or power tools.
· Assemble,
install, test or maintain electrical or electronic
wiring, equipment, appliances, apparatus or fixtures using hand and power
tools.
· Test
electrical systems or the continuity of circuits in electrical wiring,
equipment or fixtures using testing devices, such as ohmmeters, voltmeters or
oscilloscopes to ensure the compatibility and safety
of the system.
· Measure,
cut and bend wire and conduit using measuring instruments and hand tools.
· Trace
out short circuits in wiring using a test meter.
· Strip
insulation from wire ends using wire-stripping pliers
and attach wires to terminals for subsequent soldering.
· Examine
electrical units for loose connections and broken insulation, and tighten
connections using hand tools.
· Construct
controllers and panels using power drills, drill presses, taps, saws and punches.
· Drill
holes and pull or push wiring through openings using hand and power tools.
· Clean
the work area and wash parts.
Electrical control panel builder and
commissioning engineer. 03/1982
- 04/1990
Electro Systems Ltd - Blackburn, England
· Confer
with engineers, customers, or others to discuss existing or potential
engineering projects or products.
· Direct
or coordinate manufacturing, construction, installation, maintenance, support,
documentation, or testing activities to ensure compliance with specifications, codes, or customer requirements.
· Inspect
completed installations and observe operations to ensure conformance to design
and equipment specifications and compliance with operational and safety
standards.
· Inspect
and test electrical systems and equipment to locate
and diagnose malfunctions using visual inspections, testing devices and
computer software.
· Splice
wires with knives or pliers and solder connections to fixtures, power sockets
and equipment.
· Install
new fuses, electrical cables or power sources, as
required.
· Adjust,
repair or replace defective wiring and relays in ignition, lighting,
air-conditioning and safety-control systems using electrician' s tools.
· Locate
and remove or repair circuit defects, such as blown fuses or malfunctioning transistors.
Apprentice 09/1975 -
02/1980
Power Plant Electrics - Accrington
Receive on site
training in Electrical installation and control panel manufacture.
Attend college
for tuition.
Electrical
Principles
Electrical
Theory and Regulations
Education
Attending University. FDA Photography:
Foundation Degree, Photography Jun 2019
Blackburn University Centre
- Blackburn with Darwen,
England
FDA in Progress
Higher National Certificate HNC.
Electrical Technician: Jun
1982
Burnley Thomson College
- Burnley,
England
HNC Electrical
Technician certificate. Distinction
City and Guilds:
Jun 1980
Haslingden and Bury College of further education
- Haslingden,
England
C&G
Electrical installation. Distinction
C&G
Electrical theory and regulations. Distinction
Maths.
Distinction
General Certificate of Education (GEC) O
levels: Sep 1975
Accrington Grammar school
- Accrington,
lancashire
O levels in the
following subjects.
English language
English
Literature
Maths
Biology
Physics
Art
History
Geography
Woodwork
Classical
Studies
Commerce
Personal Statement
I have worked for many
years in the electrical trade from Apprentice to Contracting Site Foreman.
Throughout my career, I have developed a range of skills, which I believe to be
useful and transferable to other vocations. I have worked on an individual
basis and within a team. I pride myself on the fact that my employers
have always considered me a responsible and trustworthy asset to their company.
I have been head hunted on numerous occasions and have also been the
'go to' employee when certain advice of a technical nature is required. I
carry out any and every job assigned to me, to the best of my ability,
being punctual and diligent at all times.
Since my wife
passed away in 2010, I have had a break from work, but now, I am now looking to
use my skills to pursue a different occupation. I am an honest decent
well turned out worker and totally trustworthy. I am a confident
communicator, who is capable of motivating a team to carry out their tasks in
an efficient manner. I am also able to empathise and listen to the views of
others. I have experience in the management of skilled workers. I have
supervised contract work and the teams working on delivering these services. I
have a friendly and polite manner and am able to build good working
relationships with colleagues, customer and partner organisations.
I am computer
literate, including the use of Microsoft Office, various creative packages such
as Photoshop, Light room, email programmes, and I can carry out
basic website design. I also have my own photography website,
'isfphotography.co.uk'. I have taught myself photography and video editing, and
have an understanding of multimedia formats to display my own work and that of
the rock band, Company of Strangers. I also edit and maintain the bands website
at 'costranger.co.uk'
I am now studying Photography
at Blackburn University. Firstly a Foundation degree, then hopefully, on completion,
to move on to a BA Hons. My outlook is to eventually enjoy photography as
a hobby and also as a creative medium in which I can support myself
financially.
In my spare time, I am a keen
musician who plays the guitar and drums as a member of the afore mentioned
rock band.
I have written a self help
guide for smokers to quit the habit, which is available on Amazon under
the title 'So you think you want to quit smoking'.
I enjoy cooking and have
hosted many dinner parties. I am pro active in the running of a household and I
am totally versed in the skills that the older generation may attribute to the
fairer sex. I have no problem with multitasking and fail to see why this is
deemed a woman's domain.
Though, nearly 60yrs old, I pride
myself in having the make up and persona of a much younger person and still
feel I have a lot to offer any prospective employer.
________________________________________________________________________________________________________________
• Be pleasant mannered with a professional demeanour

Also
"Please add any other points which you believe would assist your application, including any previous experience with children"
Outcome 2C
Job Application
Advert....
Photographer - Covering Bury & Surrounding Areas
Starting monthly salary: £483 but enjoy school holidays, company car, equipment, excellent training, expenses reimbursed
As the nation’s largest photography company with over 800 employees, our Head Office and Laboratory is based in St Ives, Cornwall. Our bread and butter is academic photography ranging from toddlers in nursery groups to university graduation ceremonies, as well as the Armed Forces and Corporate Photography.
Do you want to join us?
Benefits of the role:
Term-time: enjoy school holidays, weekends and quieter times of the academic year when there is little or no photography
Company car: you will be provided with a taxed, insured and maintained Company car which is available for private use
Pension scheme and full life cover: after 3 months of service we will enrol you in the Pension scheme (you can opt-in sooner), life cover also becomes available on the 1st of August after one year’s service
Equipment: full photographic equipment is provided
Expense reimbursement: we reimburse all authorised business-related expenses
Professional training: we know that you want to keep learning and we accommodate this, we provide full training at the start of employment (which includes a fully paid week at our Head Office in St Ives). Training includes Health & Safety and Manual Handling. We will give you great, industry leading field-based training for the role to ensure you succeed
Salary: our salary year runs from 1st February to 31st January. You will be paid a guaranteed salary on a monthly basis. In addition, commission is generated from the sale of photographs taken by you. If your commission exceeds your salary a balancing payment is due as a bonus. Any bonus is paid in March
• Chat to our clients, get to know them, keep them up to date with our latest products and services
No two days are the same and our ideal person will:
• Have a passion for life with a desire to work with people and children
• Make everyone smile, from babies and children to adults
• Take brilliant photos of our existing client base
• Maintain a great relationship with current client base
• Rebook existing customers
• Provide an excellent all-round customer service experience for clients
• Be a great brand ambassador for H Tempest
• Enjoy meeting new people
• Be happy to travel and have more than twelve months driving experience• Be pleasant mannered with a professional demeanour
You are our brand ambassador and we will look after you! We are committed to making sure that H Tempest remains the best in the business and a great place to work which you can see from the great reviews we get online. Our people are our most important asset and we will continue to invest in you.
• Be flexible in working times; early starts and late finishes are sometimes necessary
All of our candidates must be willing to undergo a DBS check (or provide us with details of any previous DBS checks) and provide two referees, prior to starting with us.
Application.
Personal details and upload page for CV and cover letter (personal statement)

Application form with space to add points that would assist application
Name DOB, contact number,Drive License,
Also
"Please add any other points which you believe would assist your application, including any previous experience with children"
Text contained in the above application form form:-
'I have been a photographer for over ten years while being employed in the electrical contracting business. As the man with the camera I used my abilities to take photographs at various company events and seminars for publication in industry magazines and also for in house training leaflets. Having retired from the electrical business, I decided to go to university, and I am currently on a foundation degree course in photography to learn some of the finer points of the trade. My experience and use of photographic equipment and post processing software, i.e. Adobe Photoshop and LightRoom, precedes this course, though I am now gaining experience of working in a studio, still life, and even 35mm film, developing and darkroom and printing. I would have no trouble providing the kind of photography which you are advertising and I already have an extensive range of high quality photographic equipment from cameras to lighting which I could utilise having a familiarity with its operation. In 2018 I completed a photo shoot for the Royal Fusiliers 50th anniversary dinner in Stoke, photographing all the presentations and doig individual studio style shots for individuals and groups. They were very pleased with the results and have booked me for this years event. As a new grandfather, I am now the family baby photographer, and although I haven't had a vast amount of experience photographing children, I would be willing to experience that particular field of photography and would look forward to the challenges it may represent.
Thankyou
Yours sinceresly
Ian Fletcher
isfphotography.co.uk
__________________________________________________________
____________________________________________________________
35mm Still life Shoot Jan 2019

Using a 200mm macro lens to obtain close up of a pound coin. You can clearly see a modelling light switched on, on the strobe. This light goes out when the flash fires.


Using a torch as an extra light source

Warming the Dev chemical to 20 degrees C

Meticulously drying equipment after. Any hint of moisture on the reels will make it impossible to wind on undeveloped film as it will just stick in the spiral

Exposing for print in the darkroom

This shows a print where light has filtered through onto the paper before developing, creating the black edges on the paper

The white areas are over exposed here, but unfortunately over exposed on the negative, so there is no detail that can be obtained by reducing exposure time at the print stage

A high contrast print. I am very satisfied with the outcome of this print. The contrast was gained by using the settings on the enlarger.


To get a satisfactory contrast i first set the Magenta and Yellow dial to Grade 2, Y45, M24.
This proved to be insufficient so the shot of the Nikon lens was evetually exposed onto the paper at the Grade 3.5 setting with the appropriate Y and M values, dialled in.

The exposure timing were done in the usual way as explained above. The biggest thing to notice here is the developed print on the left. Even at the correct contrast setting, the developed strip was very low contrast and had a very flat look to it. This was a result of the developer being old or overused, so I made a fresh batch. The strip in the right was developed using the fresh batch and even using the same contrast settings, it is clear that a sharper, clearer print has been obtained.
A 1 litre bottle of a 10% developer solution is suitable to make 1000 resin coated prints.
Paper Ilford Multigrade RC


Ink jet printed contact sheet for above photographs.
__________________________________________
Developing Black and White film

All the equipment you need (minus the chemicals), to develop 35mm black and white film.
From left to right.
1. The container that you buy your film in, to which you can return your film for storage before developing
2. Your roll of film
3. A pair of scissors for cutting the film
4. An opener to gain access to the cartridge to remove the film.
5. The cassette that the undeveloped film is wound on to.
6. The center spindle forming part of the light blocking assembly
7. The developing, light proof tub.
8. The internal tub funnel designed to let liquid in and out, but keep out light.
The basic chemicals one needs are 'developer' and 'fixer'
Developer........Ilford ID11
Fixer................Ansco Hypan Fix
Developer....Stop....Fix
Note in this example we are not using the 'Stop' solution. Instead, we are using clean water
Instructions to develop one roll of Kentmere ISO 400 B&W film
The first part of the procedure, namely getting the undeveloped film from the rewound film cartridge to the developing tub, must be done in total darkness. This can be achieved by doing all the necessary steps inside a dark room environment like the one pictured below.

Firstly, make sure all of the above equipment is inside the dark box, or make yourself a darkroom with no light ingress whatsoever.
Inside the dark environment, remove the cap from the film, cut the end square, then wind the film onto the cassette.
Place cassette on pillar and place full assembly into the development tub. Insert the lightproof funnel assembly.
The development tub is now light tight and can be removed from the dark area. The tub is now ready to have the chemicals added and poured out as required for development of the film.
Safe to do in room light
Note.....Different makes of film have different development times.
Note.....The Developer, fixer, and water for washing should be close to 20 degrees Centigrade
Pour the Developer into the tub, containing your film until the level can be seen, then agitate for around 30 seconds. Then agitate for 5 seconds every minute until 9mins 30 secs have elapsed. (9min 30sec, being the development time recommended for Kentmere, ISO 400 film). Give the container a sharp knock after each agitation to dislodge any air bubbles that may have formed on the film surface.
Pour out the developer back into the original container to be used again. The developing tub is then filled with clean water and the tub is agitated for around 30secs before pouring away.
Add Fixer to the tub. Agitate for around 30 seconds, then 5 secs every minute, for 5 minutes.
Pour Fixer back into original container for further use.
Use water to wash the film in the tub. Recommended to do this three times.
First time, 10 secs, then 20 secs, then 40 secs, agitating at intervals.
Remove film from tub. At this point a squeegee can be used to remove surplus water and the film can be hung to dry in the room or in a heated cupboard. Weight the bottom of the film to prevent curling.
The film can now be cut into strips of 6 frames per strip and stored in a film folder as shown.


__________________________________________________________________________________________________________________________________________________________________
Printing a Contact sheet
First we need a frame to hold the negatives

Six negative strips can be placed on the glass hinged cover of the frame.
NOTE...at this point, because we are about to bring the photographic paper out of its light proof box, we turn off the lights and switch on safe lights which cover a part of the spectrum that we can see but the photographic paper is insensitive to. Return the unused photographic sheets to their lightproof bag
The photographic paper is laid inside the frame emulsion side up and when the frame is closed the negatives, that are inserted into the frames glass cover, will sit flat against the paper. Make sure the negatives are emulsion side down when the frame is closed, so that the prints will be the right way around.
Place the frame under the 'Enlarger' so that we are ready to expose the whole assembly to a measured amount of light, therefore exposing the paper to the light passing through the negatives. The light intensity can be adjusted to shorten or extend the exposure time.

Enlarger
With the frame in place we can take a piece of black card and cover the loaded negative but leave a small strip of the negatives uncovered. Switch on light and expose for (suggested) 4 seconds. Move the card to expose a further strip of unexposed frame. and expose for a further 4 seconds. This in effect will mean the first uncovered strip open to the light will now have accumulated 8 seconds of exposure time. Carry on moving the card at 4 second intervals until the whole frame has been exposed.
Focus finder
This piece of equipment is placed on the enlarger table on top of where the photo paper will be placed. Looking through the lens, the focus wheel on the enlarger is adjusted until a sharp focus can be seen in the focus finders small mirror, by looking at the grains on the negative which has been inserted for enlarging. Once done, it can be removed and the lights turned off to expose the print paper as normal.
The light path to the eye from the enlarger bulb is the same optical distance as the light path from the bulb to the photo paper.
Developing a Print
The lights remain out and the safe lights remain on as we remove the photographic paper and place it in a prepared tray containing an inch or so of developing fluid.
Develop for one minute while slightly agitating tray.
Remove and place paper in a tray of water for around 30 seconds with slight agitation.
Remove and place paper in a third tray containing fixer for approx 1 minute, with slight agitation.
You may now turn on the main lights and remove the photographic paper from the fix and put into bath of room temp water to wash off the chemicals. Remove and dry flat.
The finished print will have stripes at various times of exposure. We expect a series from a light exposure to a longer dark exposure. From here we can pick a suitable exposure time to develop the full contact sheet. Follow the above procedure without using any black card, and expose the whole sheet to the rows of negatives.. Follow above developing method to produce full contact sheet.

Develop one print
Insert one negative strip into the enlarger, so that one frame is projected onto the bed where the photographic paper is to be laid.
Once more, turn out the lights
Focus and adjust light and contrast to obtain an estimate of exposure length.
Turn off the enlarger light and take a piece of photo paper, resealing the rest and place the paper, emulsion side up under the enlarger.
Expose in the same way using the same black card 'exposure strip' method as we did with the contact sheet. Here we can see the strip produced after developing.

To the right, a 10 second exposure, and then a series of 20 sec, 30sec etc.
Choose best exposure time. Here, around 35 secs.
Repeat process to expose full frame for chosen time and develop to obtain final picture.

Final Print.
_________________________________________
ONGOING PORTFOLIO
COMMENCE DATE ..FEBRUARY 1ST 2019


In this photograph two of these mirrors can be seen being held in place by Playdough to illuminate the knife


Solarisation attempts

Man Ray’s “Solarizations”


The Association of Photographers (AoP)
Outcome 2

I have purchased a number of disposable mirrors to use as reflectors to light an object with more precision'

In this photograph two of these mirrors can be seen being held in place by Playdough to illuminate the knife

In this photograph two of these mirrors can be seen being held in place by Playdough to illuminate the knife


In these two pictures, one can see the small mirrors nestle in play-dough and the light being clearly directed.
These photographs were taken using 35mm film and developed by myself at home. The film was scanned and contact sheets was made using an Epson printer.


Man Ray’s “Solarisations”

Primat de la Matiere sur la pensee,
Man Ray’s “Solarizations”
During the developing process, Man Ray would momentarily flicker his studio lights, forming that distinctive inverse of tones around in his subjects.
_________________________________
_________________________________
Instead of momentarily flicking on the studio lights i used a modern speedlite to 'flash' the paper.
There a re basically three variables at work. The length of exposure, the time the paper is in the development bath before removing it to 'flash' then return to developing, and the intensity of the flash itself.
Three attempts were made at different setting.
All exposures were the same time

Develop 30 seconds, remove, flash then return to develop for further 30 seconds

Develop 20 seconds, remove, flash then return to develop for further 40 seconds

Develop 5 seconds, remove, flash then return to develop for further 55 seconds.
This produced the best result.
_______________________________________________________
Outcome 5
Utilise support networks and bodies available to sector specialists
The Association of Photographers (AoP)
The AOP is a UK based Membership Organisation that promotes, and protects the rights of photographers.
Aop was formed nearly 50 years ago and at present has around 2500 members.
Advantages of becoming a member:-
"Become recognised by those that commission photography. Support and share the values of professional photography. Achieve recognition from your peers and from the industry. Associate with those who share your values and be seen as part of that community.
The AOP has the knowledge and experience to make sure your best interests are protected"
Aop has a range of membership categories.
Accredited Photographer - professionals working for the creative industries
AOP Accredited Photographer membership is available to professional photographers who are working in the creative industries who can demonstrate the appropriate level of professional practice.
This is the top membership choice for pro photographers.
Cost £396 p.a.
Criteria and terms of this membership
- Must meet the expectations of commercial buyers and professional commissioners of photography
- Must be consistent with having been a professional photographer for more than two years
Some of the benefits of this membership package are:-
- Business and Legal support. This includes our own adviser and if required, referral to our IP specialist law firm (first half-hour consultation at a discounted member's rate).
- Listing in the Find a Photographer search area of our website including images, contact details, web & email links.
- Access to a free PDF version of Beyond the Lens, the industry gold-standard professional practice textbook with information and advice on business and legal matters
Other Categories of AoP membership having their own individual criteria:-
Assisting Photographer
Agent
STUDENT MEMBERSHIP
Student membership is free to students who are studying on a AoP affiliated course.
Unfortunately, Blackburn University FDA isnt one of them so a fee of £26.25 pa is required.
Student membership is free to students who are studying on a AoP affiliated course.
Unfortunately, Blackburn University FDA isnt one of them so a fee of £26.25 pa is required.
AoP also runs a student awards scheme where one can enter images in various categories.
As a non member, each upload will cost £8.50.
As a member benefit, the cost is £5.75.
"AOP Student Awards are a celebration of the best in photography amongst students, helping to provide that all important step up to the professional arena. By supporting new emerging talent, the Awards are an opportunity to get a first look at the potential stars of tomorrow."
This years Awards for people studying, close on 29th April.
The categories are:-
People
Places
Things.
______________
There is also an extensive list of discounts for members for various photographic services and companies
e.g.
______________
There is also an extensive list of discounts for members for various photographic services and companies
e.g.
- Metro Imaging - photographic printing & processing, scanning, mounting, exhibition and display services
- AIM Risk Services - multi-media insurance products
- Dynamic International - ATA carnet and shipping provision
- Eversure - insurance
- Eyes in Progress - photography workshops, mentoring and training
- FairFX - international currency cards and money transfer services
...to name but a few
______________________________________________________________________________________________________________________________
The Royal Photographic Society (RPS)
Membership runs at £120 p.a. for the individual, bit as with the AoP there is a concession for Students on a full time course at the cost of £55 p.a.
RPS run workshops throughout the year at a cost. I have been in touch with them for information about copyright for photographs and they also sent me information appertaining to these work shops.


They also sent information about membership and its benefits as well as the copyright information as you can see below:-


RPS run a competition on a monthly basis for members only, each month being a different theme. Winner's get their photographs published in the RPS journal. Unlike the AoP, there is no entry charge.
Membership stands at over 11,000.
The main benefits being:-
Free entry to our exhibition space
Monthly award-winning magazine
Participate in local events
Gain an RPS Distinction (see below)
Access to member only offers
Member only competitions
Specialist insurance discount
Your portfolio on our website
15 Special Interest Groups to join
Expert Distinctions advice
25% off workshops we organise
30% off Distinctions applications
30% off our IPE competition
Exclusive use of the RPS logo
Gain an RPS Distinction
The RPS offers three levels of Distinctions which set recognised standard of achievement throughout the world
1
LICENTIATE OF THE RPS (LRPS)
Requires 10 images which reflect your ability as a photographer.
2
ASSOCIATE OF THE RPS (ARPS)
Requires a body of work/project of 15 images of a high standard and a written Statement of Intent.
3
FELLOWSHIP OF THE RPS (FRPS)
Our highest level of Distinction. Requires a body of work/project of 20/21 images of a distinguished photographic and creative standard and Statement of Intent.
____________________________________________________
There will be the yearly RPS International Photography Exhibition at various venues throughout 2019.
Tickets are available to purchase on the door:
£7.00 Standard admission
Free RPS members (with valid membership card)Free Under 18s*
£5.00 Concessions (full-time students, unemployed, over 65s, disabled and carer)*
£5.00 Attendees at a Society workshop, distinction event or other RPS House event on the day*
2 May IPE 161 Photographer Talk with Clare Hewitt. Book online: MAC
22 May to 23 June Royal Albert Hall, London (view dates of public open days online)
5 July to 4 Sept Municipal Gallery, dlr LexIcon, Dún Laoghaire, Co. Dublin
4 to 27 October HIP Festival, Hull
*proof of eligibility required
30 March to 12 May Midlands Arts Centre, Birmingham
Related events:
30 March Photo Workshop with Natalie Christensen. Book online: MAC
__________________________________________
Local RPS meetings and events are held throughout 18 regions of the UK and Southern Ireland.
____________________________________________
The British Institute of Professional Photographers
Tag line......The Voice of the Profession
The BIPP is a non profit organisation that was formed in 1901 by a collection of photographers who came together at a Hotel in Fleet St. The original name was The Professional Photographers Association. By 1907, membership stood at 757. After three name changes it became the BIPP that we know today.
BIPP Why join information?
We’ll support you whilst you focus on achieving your goals and always aim to provide honest feedback and advice in a number of different areas.
You'll have the importunity to become a fully qualified photographer who stands out from their competition (sic). When you qualify, you'll be bound by a code of professional conduct adding that extra level of security to your clients.
___________________________________
The BIPP are all about qualifications. They say it is the core of what they do.
Like the other two bodies, they offer differing levels of membership from professional at £250 p.a. to student membership at £50 p.a. whilst studying.
With a student membership, one receives:-
- Discounts on training
- Discounts on goods and services
- The Photographer magazine
- Regional and national meetings and events
- Support and networking
- Competitions and awards
The magazine being published 4 times per year.
Their qualification scheme is very similar to the RPS distinction scheme and is as follows:-
There are three qualifications, each reflecting increasing levels of experience, skill and achievement.
- Licentiateship (LBIPP)
- Entry level qualification, showing an established professional level of skill and competence
- Associateship (ABIPP)
- A high standard of craftsmanship and creative ability
- Fellowship (FBIPP)
- Attainable for distinguished and exceptional ability and creativity
Also like the RPS, assessment days are set throughout the year for people to submit their photographs to try to gain one of the qualifications on offer. This will cost you £150.
On the application form it asks for the name of ones BIPP mentor. but it doesn't mention anywhere on the website where find someone to fill that roll? I will call and ask.
It is recommended that one does a portfolio review before applying for a qualification.
That's another £50 for members for a 45 min assessment.
A 2 hour assessment will cost £90 as a member.
If one can gain a qualification, the BIPP has this list of benefits in doing so:-
- internationally recognised professional qualifications...leading to increased prominence in the market place
- recognition of your qualification by other organisations and employers
- the opportunity to achieve a BA (Hons) Photography degree through the OCA with just one year of study
- a tiered structure offering continual professional development
- qualifications advice
- events and seminars across the country
- portfolio reviews
- regional meetings
- subsidised training by industry leaders
- entry to the Professional Photography Awards
- entry to the BIPP Towergate Camerasure Fine Art Competition
- the Photographer magazine
- regular email updates
- use of the BIPP logo
- your own portfolio page on bipp.com
- business generation leads
- free resources - contracts, licensing, releases etc.
- discounted display advertising
- preferential deals from 3rd party companies
- international network of contacts
- credit card processing packages
- free 24/7 legal helpline
- exclusive UK access to the Federation of European Photographers
- the peace of mind that comes with a framework of a code of professional conduct and complaints procedure
- promotion of qualified members to the users of photography/buyer
______________________________________________________________
An small selection of pictures from the Blackburn Brief
The Dennis F15 HCB500 Engine
Eventually I made contact with The PR Manager at Fulwood Firestation. A Mr John Taylor. He informed me that the Dennis engine in question was at the Fire Training Centre in Chorley. I was invited down on Friday the 15th of Feb to have a closer look and take some pictures of this old machine that once resided in Blackburn..

The engine itself was housed in a garage and i was unable to have the engine moved into a more suitable location for photographing. Using two strobes with soft boxes I attempted to reduce the ambient light as the surrounding paraphernalia was of no interest.

Details of the engine which are displayed next to the Dennis when it is out for public display.

After taking pictures of the engine itself, I proceeded to take more intimate pictures of the engine to show the details of the old equipment that differs immensely from modern fire fighting equipment


Unwanted highlights on the paintwork. A result of having no room to move the strobe further away.


The six cylinder Rolls Royce petrol engine


The sieve used to strain water from any nearby water source, such as a pond when using that available water to fight a fire.

The only label on the machine that states that the engine was indeed from Blackburn. Once again, limited space meant that i could not get further back from the engine to get a shot of the whole side.
Tuesday 12th March.
Today's first shoot at the Blackburn fire station had to be called off as bad weather meant that the station fire crews were on Flood Alert.
Bradford Photography and Media Museum
and Salt Mills


_________________________________________

I started with an elogated gridded soft box on either side of the model and also added an overhead softbox to try and add some light to the model's jet black hair.

The left and right softboxes are clearly evident on the model arm and dress, though the darkness of the hair is still causing problems.

I added a snoot to ad some light to the underside of the models hair and to cast some light onto her face.


I reduced the power on the right hand softbox to reduce what I have come to call, the sandwich effect (maybe it will catch on). The snoot did its job to add light to the face.

In this photograph, though the snoot did its job on the models face but also caused an unwanted harsh shadow of the models hand on her dress.

This photograph used the same lighting as above but with reduced power in both left and right strobes. This led to the 'rim' lighting being minimised, and maybe making the dress look a little 'flat'. I did add a small vignette in Lightroom. Probably a symptom of looking at a flat image and feeling it needed something. Not really well lit in my opinion.
Rim Lighting
Rim lighting, sometimes referred to as back light, is light placed on your subject which gives the appearance of an outline or emphasises an edge to give the object more of a three dimensional look, e.g


To attempt to soften the light further, I turned both light boxes onto the white reflective surfaces as shown and made some photographs using this set up


I mistake in not noticing the models clothes going slightly out of shot.
The studio floor ?

All these pictures have had the studio floor cleaned up in Photoshop, as there were many scrapes, dirty marks and scuffs which have no bearing on the photograph and were unsightly.

The original photograph showing the studio floor.
________________________________________________________
Building shoot for Sales catalogue


No comments:
Post a Comment