Light Modifiers
Golden rule of lights
BIG LIGHTS, SOFT LIGHT, SOFT SHADOWS
SMALL LIGHTS, HARD LIGHT, HARD SHADOWS
 |
| Bowens fit reflectors. Left to right |
Backlight reflector. (lighting behind models or lighting back drops etc)
Grid reflector. (More directional lighting with spill)
Wide angle reflector. (To spread light over wider area)

Barn door reflector
Grid reflector fitted with moveable panels to 'flag' light off from spilling into areas.
This reflector can, like many others, be fitted with a honeycomb grid and,or, coloured gels.
 |
| Grid reflector Fitted honeycomb grid to reduce spill and direct light in a more controlled way. |

Snoot
To concentrate the light onto an area with a small spotlight effect.
Can also have a honeycomb grid fitted to prevent spill

Beauty dish
Can be used with or without removeable doughnut shaped diffuser. The dish has a centre fitted disc to prevent central flash highlights.
Used for model head shots and beauty make up photography etc
 Umbrella
These can be all white, or black with a silvered interior. An all white umbrella can be
used as a diffuser with the strobe pointing through the fabric. As in the above model, the strobe would point into the umbrella and light is reflected back onto the model and slightly focused because of the concave shape. The white interior can be removed revealing a silver surface to reflect a greater amount of harder light.

Soft boxes
Used to create larger areas of softer light, depending on size and shape of the softbox.
Soft boxes can be fitted with honeycomb grids as shown above to reduce spill.

 Strobe on stand showing fitted softbox

These can be all white, or black with a silvered interior. An all white umbrella can be
used as a diffuser with the strobe pointing through the fabric. As in the above model, the strobe would point into the umbrella and light is reflected back onto the model and slightly focused because of the concave shape. The white interior can be removed revealing a silver surface to reflect a greater amount of harder light.

Soft boxes
Used to create larger areas of softer light, depending on size and shape of the softbox.
Soft boxes can be fitted with honeycomb grids as shown above to reduce spill.


Two sided polystyrene panel
Double sided panel, black on one side, white on the other.
Can be used as a large reflector or as a medium to kill stray light.
Double sided panel, black on one side, white on the other.
Can be used as a large reflector or as a medium to kill stray light.
Lighting

Strobe
A larger more powerful flash than an ordinary speedlite and referred to as a Monolight
or strobe.


Universal Spotlight
Used to project patterns of light on a scene using the many
templates provided. You can also create your own templates.

LED Panel
Used as a constant light source. Very good for still life photography.

Damaged strobe bulb cover
Strobes, unlike speedlites have a modelling bulb as a source of constant light, as well
the flash bulb. The modelling light can become very hot and should be left to cool down after use
before fitting the plastic protective cover. If not adhered to, the above result may occur.
 Sekonic Light meter
Shutter speed and ISO value can be inputted into this light meter. Once entered, it is possible to take
an ambient light reading or a flash reading, and the suitable f.stop setting will
be displayed. If for example a flash reading gives you a recommended aperture of f11 but you desire to use f4 then one has to reduce the flash power to compensate for the wider aperture. Reduce flash power and take readings until the desired f.stop is obtained.
Accessories


A piece of kit designed to hold you camera still during exposure. To make the stand more sturdy, one can attach sand bags around the base. Useful outside if windy. Some tripods come with hooks under the central shaft to facilitate a weighted bag or even the handy camera bag.

multiple shots of still life or a product where different lighting can be applied for each shot and result can be added to PhotoShop as layers for editing.

Used to send signals from the camera to the flash heads.
These can be wireless or infrared. Some remote transmitters are able to control the flash power
so that one can alter the power at the camera location without having to go to each strobe individually. Very handy if you are using a number of strobes.

used to practice lighting faces

The understated, yet most import tool in the studio
___________________________________________________________________
Health and safety in the studio
When using studio equipment, it is important to take health and safety into consideration. Equipment must be used correctly and in a way that will not cause injury to other people working in the studio enviroment.
Examples of safety practices.

Power and other cables are a main cause of trip hazards in a studio. Leads should be taped to the floor to prevent the possibility of a person tripping and causing injury.
Equipment must not be left lying around on the floor causing trip hazards and at the end of any session, all equipment must be put back in its designated space.
Lighting stands must be erected and used correctly:-

Incorrect

Correct
To make the stand more sturdy, one can attach sand bags around the base.
__________________________________________________________________________________________________________________________________________________________________
Basic Camera controls

The main controls one would find on a camera are as above, and the ones that are important are
M, A, S,and P
P Programmable mode
In this mode the camera will meter the light and automatically choose an aperture setting and a shutter speed. You can then alter the shutter speed and the camera will compensate by automatically changing the aperture. Change the aperture and the camera will respond by changing the shutter speed to give a correct exposure.
A Aperture Priority
Aperture priority is a semi auto mode whereby you select the desired aperture and the camera will alter the shutter speed to obtain a correct exposure.
S Shutter priority
Shutter priority is a semi auto mode whereby you select the desired shutter speed and the camera will alter the aperture to obtain a correct exposure.
M Manual
Manual is where the photographer has total control over the shutter speed and the aperture settings.
______________________________________________________
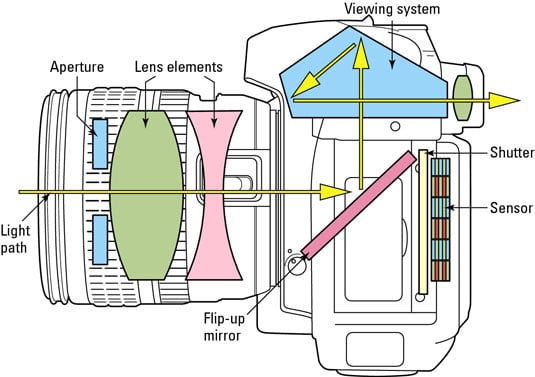
The light entering the camera follows the route as shown by the yellow line into your eye. When the shutter button is depressed, the aperture closes down to the f stop selected and the mirror raises, so that the light can hit the sensor at the back of the camera.
______________________________________________________
What you see through the view finder
The light entering the camera follows the route as shown by the yellow line into your eye. When the shutter button is depressed, the aperture closes down to the f stop selected and the mirror raises, so that the light can hit the sensor at the back of the camera.
_________________________________________________________________________________
The three settings that govern the exposure are Aperture, Shutter speed and ISO
The Aperture

When looking through the viewfinder of a DSLR the aperture will be wide open at an f stop value that is specific to the lens that you are using. When the shutter is depressed the aperture will close down to the setting that has been set in the camera. As can be seen from the illustration, the higher the f value, the smaller the aperture, therefore the less light that enters the camera. The aperture also affects the depth of field. To compensate for the amount of light entering the camera we can adjust the speed of the shutter.
Shutter speed
The shutter can be any measure of time from 'bulb', which is where you can open the shutter for any desired length of time, to fractions of a second, ie 1/8 sec up to, on some cameras 1/8000 sec.
As one increases the size of the aperture, one would decrease the length of time the shutter is open to obtain the same exposure. As one increases the shutter speed, a smaller aperture would have to be selected to obtain the correct exposure.
ISO Setting
ISO appertains to the sensitivity of the cameras sensor. If the ambient light is low then one would raise the ISO setting making the cameras sensor more sensitive to light and therefore allowing one to increase the shutter speed if so desired. If the ISO is increased to a very high level, grain is introduced into the photograph as illustrated above. Altering exposure using ISO
_________________________________________________________________________________
_________________________________________________________________________________
The Exposure Triangle
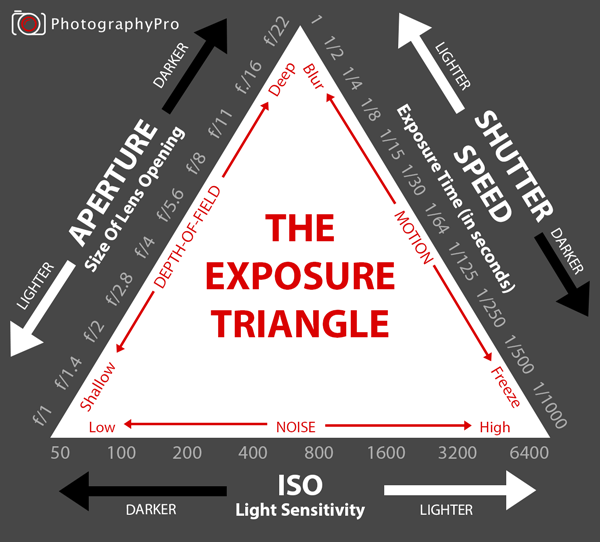
The exposure triangle brings together the relationship between aperture, shutter speed and ISO setting in one diagram.
________________________________________________________________________________
_________________________________________________________________________________
Studio shots using a single mono light

50mm at f8

50mm at f8
_________________________________________________________________________________
Exercise with camera exposure
Putting the camera into manual, I took a succession of 5 photographs beginning with a correct exposure (utilising in camera light meter) then reduced the shutter speed for each shot maintaining the same ISO and aperture setting. The result is an increase in light entering the camera for each time the shutter speed is lowered leading to each successive photography being more exposed than the previous.

1/50 sec f8 ISO 400 50mm

1/30 sec f8 ISO 400 50mm

1/20 sec f8 ISO 400 50mm

1/13 sec f8 ISO 400 50mm

1/8 sec f8 ISO 400 50mm
______________________________________________________
The relationship between aperture setting, and the DOF.
The first photo was shot 'wide open' which means the aperture was set as wide (large diameter) as possible to let the most light into the camera which resulted in a very small depth of field. In each successive photo, the aperture was reduced. Note that when the aperture is made smaller, the depth of field becomes larger and more of the photo is in focus. Also note that for ever reduction in the size of the aperture, the shutter speed has to be made slower to allow more light into the camera to achieve the correct exposure.

1/1250 sec f 1.8 ISO 400 50mm

1/640 sec f 2.5 ISO 400 50mm

1/320 sec f 3.5 ISO 400 50mm

1/160 sec f 5.0 ISO 400 50mm

1/60 sec f 8 ISO 400 50mm

1/20 sec f 14 ISO 400 50mm
A couple more DOF examples:-

Shallow depth of field created by a wide open aperture setting of
f1.8.
ISO 100...50mm...1/6400sec

A deep depth of field obtained by closing down the aperture to
f16.
As the aperture is a lot smaller, we have to compensate by reducing the shutter speed to obtain the same exposure
ISO 100...50mm...1/250sec
______________________________________________________
Using ISO to set sensor sensitivity suitable for available light conditions
The ISO setting controls the sensitivity of the sensor to light. If you take a correctly exposed photo and then raise the ISO setting without changing any of the other settings, we will find that the next photo will be overexposed. Lowering the ISO will underexpose the next picture. This can be very useful in low light conditions to obtain a higher shutter speed for any given aperture, or a narrower aperture for any given shutter speed. The downside of high ISO settings, is that grain, or noise will be introduced into the photograph. In the following five photos we have raised the ISO from 400, all the way up to 12800. We find that more and more graininess is introduced into the pictures as the ISO increases. The aperture remained constant, but as the sensitivity of the sensor increases, the shutter speed has to be increased to compensate, thus achieving the right exposure.

1/500 sec f 2.2 ISO 400 50mm

1/1000 sec f 2.2 ISO 800 50mm

1/1250 sec f 2.2 ISO 1600 50mm

1/4000 sec f 2.2 ISO 6400 50mm

1/6400 sec f 2.2 ISO 12800 50mm
______________________________________________________
On board camera light meter
This sequence of pictures is a small exercise in how an on board light meter cant always get it right.
The first picture was exposed by zeroing the exposure meter scale using the shutter speed control, keeping the aperture and ISO constant, then taking the shot. What the camera has done, is metered the whole scene, (in matrix metering mode, which basically means the light in the whole scene is metered and an average value taken) and then come up with the correct shutter speed for an exposure. Unfortunately, in this picture, there is a huge amount of white in the sign and the camera has decided that rather than over expose the white, it has recommended a shutter speed that has underexposed the whole image. At this point we can ignore the camera exposure scale and, not having light meter handy, decrease the shutter speed ourselves to obtain a better exposed image. With a film camera we wouldn't have the luxury of checking our exposure so a light meter would be very useful in that case.

Suggested exposure using camera light meter scale
1/1250 sec f 4 ISO 400 50mm

1/1000 sec f 4 ISO 400 50mm

1/500 sec f 4 ISO 400 50mm

1/320 sec f 4 ISO 400 50mm
______________________________________________________
Nikon FM2T.
Full metal Jacket, quote
Marines: This is my rifle. There are many like it but this one is mine. My rifle is my best friend. It is my life. I must master it as I must master my life. Without me, my rifle is useless. Without my rifle I am useless.

__________________________________________________________________________________________________________________________________________________________________
FLASH SYNC
When using a flash, the actual flash of light produced by a strobe, or speed lite has to be in synchronisation (sync) with the cameras shutter. This means that the shutter has to be fully open when the flash fires, so as to expose the whole frame to the light.
Consider a shutter that has two curtains. Curtain one covers the film or sensor blocking the light from making an exposure. When the shutter 'release' is pressed (so called as older cameras had a mechanical shutter which was primed by the film wind on button, and the spring loaded mechanism would be 'released' by the press of the shutter button), curtain one would open, the flash fires, and then curtain two would close. The timing has to be precise. The camera can only perform this task up to a certain shutter speed. As the shutter speed is increased, the second curtain will commence to close 'before' the first curtain has full opened. Therefore, the whole of the sensor or film is never fully open to the flash and one will find that you will inevitable take a photograph with the second curtain on its way to closing.

In this example the flash goes off as soon as the first curtain has opened fully and is out of sight at the top.
Unfortunately, because the shutter speed is set at 1/320s, the second curtain has already begun to close and the flash captures it in mid movement.
To overcome this problem, there is a flash system known as Hi Speed Sync, or HSS.
To overcome this problem, there is a flash system known as Hi Speed Sync, or HSS.
The Principles of HSS
Shutter speed 1/100s
At 1/100s the shutter can be seen fully opening before the second curtain begins to close. The flash is triggered at this point to expose the whole sensor. Therefore the flash is said to be in sync with the shutter and the HSS system setting is not required. At higher shutter speed we have the following problem.
Shutter speed 1/1000s
At 1/1000s it is plain to see that the shutter is never fully open as the second curtain follows the first to basically drag a slot of light across the sensor. This is fine for continuous light (neon or bulb etc), or ambient light, but not for flash as you would see the second curtain in shot as above. (Note, though the second curtain comes down from the top, the image is shaded from below, as all images on the sensor are upside down)
Modern cameras have a system known as HSS or hi speed sync. Though the method is different for different makes of cameras, the idea is that light from the flash is constantly available as the 'slot' passes the sensor. (Nikon uses a flash pulse method and Canon and extended flash time method).
Using this sysetm, one can sync a flash all the way up to 1/8000s and beyond. The downside is that the flash is not as intense and other adjustments have to be made for the correct exposure.
Composition
All pictures by Ian Fletcher
Composition at a basic level is just a matter of making a photograph where the subject or subjects are placed in the frame in a pleasing and well balanced manner. This can be achieved by certain rules that are a starting point in the layout of photographs, but , do not have to be strictly adhered to.
Rule of thirds

An example of rule of thirds.
 The horizon and the birds wings fall on the rule of thirds lines.
(Sanibel Island Pelican)
Fitting objects along the lines of the above frame or in spaces is said to enhance the composition of the image.
There are other ways and rules to improve composition such as:-
Balancing Objects
 A turret and a Monument taking there own thirds space balancing the frame.
(Budapest)
Leading Lines
 Norway
 Spain
Spain
 Florida
Paths, roads and trails running through the photograph.
Symmetry and patterns
 A pattern of squares in glass. (Budapest Museum window)
Viewpoint
 A viewpoint high in the Norwegian fjords
unobtrusive background
 Making the background unobtrusive by using a shallow depth of field and totally obscuring any detail.
Depth
 Pennington Flash, Warrington using a large dof (small aperture)to give an impression of depth in the photograph
Framing
 Using the surrounding rock features to frame the small bay. (Tintagel)
Cropping
 Cropping in close to draw attention to one particular item.
(glass blowers, Venice)
Experimentation
 See a picture opportunity and take it, without thinking about composition, experiment.
An example of rule of thirds.

(Sanibel Island Pelican)
Balancing Objects

(Budapest)
Leading Lines


Florida
Paths, roads and trails running through the photograph.
Symmetry and patterns

Viewpoint

unobtrusive background

Depth

Framing

Cropping

(glass blowers, Venice)
Experimentation

Shutter speed and blur

A car travelling at approximately 30mph can be made to look motionless by a fast shutter speed, basically capturing an instant of time.
50mm ISO 250 f7.1 fast shutter 1/500

In this instance we panned the camera. (actually follow the car with the camera as we release the shutter). In this way, we attempt to get a sharp picture of the moving car while the movement of the camera and the relative slow shutter speed create motion blur in the background.
50mm ISO 80 f14 1/25sec

Even if we increase the speed from 1/25 in the last picture to 1/50, we can see that moving the camera while releasing the shutter is going to capture significant movement.
__________________________________________________________________________________________________________________________________________________________________
Continuous light photography

Lit by an LED continuous light panel. As this picture was taken hand held, I selected a shutter speed of 1/80 to minimise motion blur. Because the lighting was low, a wide aperture was selected, which means more light can hit the sensor in the given 1/80 sec. This will also mean the image will have a very shallow depth of field. Even with these setting's the ISO had to be pushed up to 2500 to achieve a satisfactory exposure.

The same picture as above with a few PhotoShop tweaks

With the camera now on a tripod we can extend the shutter speed without worrying about motion blur as the camera does not move.
Still with a shallow depth of field, a 2 second exposure obtains this result at f 2.0

Here I changed the f stop to f 5 to get slightly more dof.
Even with this small change and upping the ISO to 400, the camera exposure scale suggested a shutter speed of 15 sec. This shows how the camera light meter doesn't always get it right, and has led to this slightly over exposed image.

Increasing the shutter speed led to this better exposure

The aperture on the 50mm lens I used can be opened to f 1.8 giving a very shallow dof.
__________________________________________________________________________________________________________________________________________________________________
Photography with Film

Nikon FM2T 35mm film camera.
Load film into camera as shown below

Insert film cartridge

Feed film onto winding-on spool

Use wind on leaver to make sure the film is properly located on the take up spool.. You may use the rewind button to carefully take up any slack in the film cartridge.
Close the lid and you are now ready to take pictures.
When you have run out of exposures you will find you can no longer wind on the film.
At this point, press and hold the film release button (usually on the bottom of the camera) and use the rewind knob to rewind the film back onto the original spool.

Developing Black and White film

All the equipment you need (minus the chemicals), to develop 35mm black and white film.
From left to right.
1. The container that you buy your film in, to which you can return your film for storage before developing
2. Your roll of film
3. A pair of scissors for cutting the film
4. An opener to gain access to the cartridge to remove the film.
5. The cassette that the undeveloped film is wound on to.
6. The center spindle forming part of the light blocking assembly
7. The developing, light proof tub.
8. The internal tub funnel designed to let liquid in and out, but keep out light.
The basic chemicals one needs are 'developer' and 'fixer'
Developer........Ilford ID11
Fixer................Ansco Hypan Fix

Developer....Stop....Fix
Note in this example we are not using the 'Stop' solution. Instead, we are using clean water
Instructions to develop one roll of Kentmere ISO 400 B&W film
The first part of the procedure, namely getting the undeveloped film from the rewound film cartridge to the developing tub, must be done in total darkness. This can be achieved by doing all the necessary steps inside a dark room environment like the one pictured below.

Firstly, make sure all of the above equipment is inside the dark box, or make yourself a darkroom with no light ingress whatsoever.
Inside the dark environment, remove the cap from the film, cut the end square, then wind the film onto the cassette.
Place cassette on pillar and place full assembly into the development tub. Insert the lightproof funnel assembly.
The development tub is now light tight and can be removed from the dark area. The tub is now ready to have the chemicals added and poured out as required for development of the film.
Safe to do in room light
Note.....Different makes of film have different development times.
Note.....The Developer, fixer, and water for washing should be close to 20 degrees Centigrade
Pour the Developer into the tub, containing your film until the level can be seen, then agitate for around 30 seconds. Then agitate for 5 seconds every minute until 9mins 30 secs have elapsed. (9min 30sec, being the development time recommended for Kentmere, ISO 400 film). Give the container a sharp knock after each agitation to dislodge any air bubbles that may have formed on the film surface.
Pour out the developer back into the original container to be used again. The developing tub is then filled with clean water and the tub is agitated for around 30secs before pouring away.
Add Fixer to the tub. Agitate for around 30 seconds, then 5 secs every minute, for 5 minutes.
Pour Fixer back into original container for further use.
Use water to wash the film in the tub. Recommended to do this three times.
First time, 10 secs, then 20 secs, then 40 secs, agitating at intervals.
Remove film from tub. At this point a squeegee can be used to remove surplus water and the film can be hung to dry in the room or in a heated cupboard. Weight the bottom of the film to prevent curling.
The film can now be cut into strips of 6 frames per strip and stored in a film folder as shown.


__________________________________________________________________________________________________________________________________________________________________
Printing a Contact sheet
First we need a frame to hold the negatives

Six negative strips can be placed on the glass hinged cover of the frame.
NOTE...at this point, because we are about to bring the photographic paper out of its light proof box, we turn off the lights and switch on safe lights which cover a part of the spectrum that we can see but the photographic paper is insensitive to. Return the unused photographic sheets to their lightproof bag
The photographic paper is laid inside the frame emulsion side up and when the frame is closed the negatives, that are inserted into the frames glass cover, will sit flat against the paper. Make sure the negatives are emulsion side down when the frame is closed, so that the prints will be the right way around.
Place the frame under the 'Enlarger' so that we are ready to expose the whole assembly to a measured amount of light, therefore exposing the paper to the light passing through the negatives. The light intensity can be adjusted to shorten or extend the exposure time.

Enlarger
With the frame in place we can take a piece of black card and cover the loaded negative but leave a small strip of the negatives uncovered. Switch on light and expose for (suggested) 4 seconds. Move the card to expose a further strip of unexposed frame. and expose for a further 4 seconds. This in effect will mean the first uncovered strip open to the light will now have accumulated 8 seconds of exposure time. Carry on moving the card at 4 second intervals until the whole frame has been exposed.

Focus finder
This piece of equipment is placed on the enlarger table on top of where the photo paper will be placed. Looking through the lens, the focus wheel on the enlarger is adjusted until a sharp focus can be seen in the focus finders small mirror, by looking at the grains on the negative which has been inserted for enlarging. Once done, it can be removed and the lights turned off to expose the print paper as normal.
The light path to the eye from the enlarger bulb is the same optical distance as the light path from the bulb to the photo paper.
Developing a Print
The lights remain out and the safe lights remain on as we remove the photographic paper and place it in a prepared tray containing an inch or so of developing fluid.
Develop for one minute while slightly agitating tray.
Remove and place paper in a tray of water for around 30 seconds with slight agitation.
Remove and place paper in a third tray containing fixer for approx 1 minute, with slight agitation.
You may now turn on the main lights and remove the photographic paper from the fix and put into bath of room temp water to wash off the chemicals. Remove and dry flat.
The finished print will have stripes at various times of exposure. We expect a series from a light exposure to a longer dark exposure. From here we can pick a suitable exposure time to develop the full contact sheet. Follow the above procedure without using any black card, and expose the whole sheet to the rows of negatives.. Follow above developing method to produce full contact sheet.

Develop one print
Insert one negative strip into the enlarger, so that one frame is projected onto the bed where the photographic paper is to be laid.
Once more, turn out the lights
Focus and adjust light and contrast to obtain an estimate of exposure length.
Turn off the enlarger light and take a piece of photo paper, resealing the rest and place the paper, emulsion side up under the enlarger.
Expose in the same way using the same black card 'exposure strip' method as we did with the contact sheet. Here we can see the strip produced after developing.

To the right, a 10 second exposure, and then a series of 20 sec, 30sec etc.
Choose best exposure time. Here, around 35 secs.
Repeat process to expose full frame for chosen time and develop to obtain final picture.

Final Print.
Safe File Storage Practices
Methods of in camera storage.

Camera with one SD card slot

Camera with two SD card slots

Camera with one CEF card slot and one SD card slot
Cameras with two card slots can be set, so that the second card makes an identical backup copy of the primary card every time a photograph is taken. It is recommended on a shoot to replace the back up card, or the single card, (in a one card camera), every hour or so in case the card card 'fails'.
Always fully format any card 'in camera' before a shoot, and never use the camera to delete individual pictures as this risks causing the card to become corrupt.
It is always better to remove a card, from the camera, and insert it into the computer to transfer picture files to your photo editor or desktop, as a data lead could lead to programme corruption in the camera software..
Label all files with dates, names and locations and keep in individual labelled folders.
It is advised to make identical copies of these folders, be it on external hard drives, cloud services, or both. Or indeed, two identical external hard drives.
When exporting files from Lightroom for a customer, it is suggested that you could provide the customer with one folder of photographs for printing and another folder of photographs displaying your logo, and or, watermark; asking if, when they share photographs, they would share the labelled copies to further your recognition and customer base..
After a period of, for example, one month, It is suggested that if you have used two external hard drives to back up your photographs, you could label them with the appropriate dates and store them indefinitely together as master and slave, purchasing two more hard drives for future use.
Lightroom itself has an intensive cataloguing, key-wording and labelling system, that can be used before exporting to jpegs and your own safe practices..
Another method of safe storage is the RAID system, where 4 drives are required. Any drive that fails can be replaced and the new drive will be populated by the other three. This is a very safe internal method of storing data.

Raid 10 system.

My own personal 4 x 1 TB Hard drive RAID 10 system
__________________________________________________________________________________________________________________________________________________________________
Scanning Negatives for the PC

Above is a Scanner specifically designed for scanning film negatives of various formats. We will use the 35mm template.


Load negatives into the scanner tray, taking note of the orientation of the negative strip as shown by the indicative illustration on the plastic frame itself.
Close the scanner lid, open the scanner programme and after making sure the correct film type is selected, click on the preview button.

Once the preview screen is active, select the frames to be scanned and input the correct output settings following the guide below, as in this case, to produce a scanned image that will be able to be printed on a 10 x 8 photo paper.

Below is a selection of scanned black and white negatives

Bike rack, Blackburn


Blackburn Court House

Accrington market Hall

Platts Lodge, Accrington

Platts Lodge, Accrington
__________________________________________________________________________________________________________________________________________________________________
Studio Photographers
The three genres of photography are.
1 Portrait
2 Landscapes
3 Still life.
Be familiar with iconic studio photographers, understanding types of studio photography to avoid and understand how to evaluate images.
Types of studio photography to avoid examples:-

Simplistic and generic with simple shallow depth of field for effect.

Staged unnatural pose for a dog with same shallow depth to obtain a modicum of effect.

Standard family shot devoid of any personal character with not a lot to say about the family in question.
_________________________________________________________________________________
Irving Penn 1917-2009
American, Penn was best known for his portrait photographs having worked for Vogue magazine, and also as an independent for clients such as Miyake and Clinique.

Salvador Dali by Irving Penn, 1947, gifted by Penn to the American Art museum. Penn showing Dali as the flamboyant, eccentric surrealist painter.

A more serious pose to show the status of the subject, King Gustav VI of Sweden in 1964.
_________________________________________________________________________________
Richard Avedon 1923-2004
American, Avedon was known for his portraits and his work in the fashion industry. He once said, quote "My portraits are more about me than they are about the people I photograph'.
Said to have helped define the American style and culture for the last 50 years or so.

A less than flattering portrait of Marilyn Monroe which says more about the reality of the actresses life rather than the glitzy Hollywood portrayal we all know.

Shot in 1993 for that years Versace campaign in New York, featuring models, Kate Moss and Aya Thorgren.
A similar set of pictures were taken with the same theme in mind

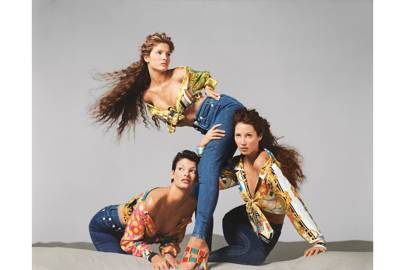
These wild poses were said to reflect the fashion of its time portraying the models as wild women with striking 'violent' patterns. A statement about the feminist energy of the time.
"If you do what I've done, which is to record the beauty of your time, that doesn't go out of fashion." Avedon
https://www.avedonfoundation.org/
_________________________________________________________________


https://www.avedonfoundation.org/
_________________________________________________________________
Albert Watson 1942-
Scottish photographer known for photographing fashion portraits and art and also commercial work. has shot covers for rolling stone magazine and vogue since the 70's. and also created major campaigns for company's including Prada, Levi and Chanel
Created in 1992, for Rolling Stone magazine, is this composite photograph of Mick Jagger and a leopard. Maybe Watson wanted to portray Jagger as the bad boy animal in the world of music at the time.

Watson's more commercial work shows that his interest wasn't totally in fashion and art. Here taking a photograph of a glove recovered from the burial room of Tutankhamen, in a pretty much, catalogue photograph style. Watson was not adverse to still life showing himself to be a versatile photographer, not hindered by the fact he has been blind in one eye since birth.
_________________________________________________________________________________
Jan Groover 1943-2012
In the 70's groover experimenting with the latest colour technologies and produced many still life pictures centred around kitchenware.

Various kitchen item, painted and positioned to fill the frame. Groover's photographs tended not to leave a lot of empty space.

More kitchen utensils, filling all the space in the frame. Groover took to still and made this particular style her own.

_________________________________________________________________________________
John Blakemore 1936-

An English photographer who has a huge catalogue of landscape and skilled life. This picture is one from his slight tulip obsession at the time. Taken from his book The Stilled Gaze, 1994.
"The tulip became an object of attention and fascination. It became both text and pretext for an activity of picture-making". Blackmore.
_________________________________________________________________________________
Paulette Tavormina 1949
An American 'Fine Art' photographer best known for her series Natura Morta (still life) taking photographs influenced by the still life painters of the 17th century.

An arrangement of flowers, shells and small insects, butterfly's and in this case, goldfish, apparently trying to flee their prison or confinement.

A collage of notes and pictures and little keepsakes that you would find in a romantic setting.
This photograph entitled love stories.

A photograph in the same style entitled Love Notes.
Having worked for six year in Sotheby's auction house in New York she had developed a taste for fine art. Also having a grounding in the food industry she still takes photographic images for cook books.
_________________________________________________________________________________
Felix Nadar 1820-1910

An early self portrait of the french photographer 1865. Maybe took as a way of showing people the whole person, or self, rather than the two dimensional restrictions of portraiture. Photography at the time was a new phenomenon and unwittingly Nadar had really created the frames of a movie, before movies were even possible.

The frames played as a movie

Edouard manet
Nadars portrait of French painter Edouard manet. A casual relaxed shot showing Nadar could go from experimental to standard portraits.
Hadar's experimentation took him to great height's, literally, as he became was the first photographer to take aerial photos.
_________________________________________________________________________________
Brian Griffin 1948-
"Ive spent a lifetime tidying up the world" Griffin.
British photographer known for his mostly staged photographs of the working classes developing a style which has been referred to as Capitalist Realism

Black country Factory worker 2010.
Could be said to be portraying capitalism at its worst with only the working classes getting their hands dirty while the wealthy reap the benefits. A link to the Black Country, so called because of the 30 foot coal seam that comes to the surface in the area.

Harrison Ford as Han Solo
A completely different genre, portraying the actor as the character he is playing rather than being a standard, face on portrait. Han Solo, man of action.

Carrie Fisher as Princess Leia.
A clever use of movement in the Carrie's cape to simulate wind in the outside world or an alien planet, though most likely a staged studio shot.
_________________________________________________________________________________
Olivier Richon 1956-
A Swiss photographer and a professor and the head of photography at the Royal College of Art in London, where he now resides. A keen photographer of animals and still life, which sounds a bit of an oxymoron, but not all his photos of animals are of dead ones. These are two pictures from his Acadia solo show in London. It had a general theme of hunting with no clue as to the photographers personal views on the subject

Showing two severed Salmon heads. The result of hunting for food showing what is discarded or used for dog food, perhaps, when the 'human' animal has taken his fill.

The Quarry 1995
 The placement of a hand between a light source and a sheet of tracing paper clearly shows the soft shadows created by diffused light. Reducing the distance from the diffusing medium, in this case where the fingers touch the paper, we can see a greatly reduced amount of diffusion.
_____________________________________________________________________________
A dead deer that could have been hunted for food, but more likely to have been hunted for the sheer pleasure of the hunt. The animal is shown discarded and of no use to anyone once its purpose as pray has been fulfilled. Richon has left the interpretation to the individual observer, though a clear message of exploitation is being sent.


_________________________________________________________________________________
Norman Riley 1954-
Born in Munich and now living in Washington, driven to work in Black and White from the start purely because it was cheaper.

A photo of a manikin repair shop. There is a bit of movement in one of the 'arm's. As Riley is known for the occasional portrait and landscape, and more so for his abstract creations, below, its hard to imagine what the manikin picture is doing in his collection as it stands remotely from his usual work. The photograph itself can be seen to be the disembodied, mainly, arms on a production line which is in contrast to the usual items on a production line with the arm belonging to the workers about their tasks.

Rileys abstract creations show the artist also has a penchant for art and design in the filed of model and sculpture and has a hands on approach to create what he is photographing.
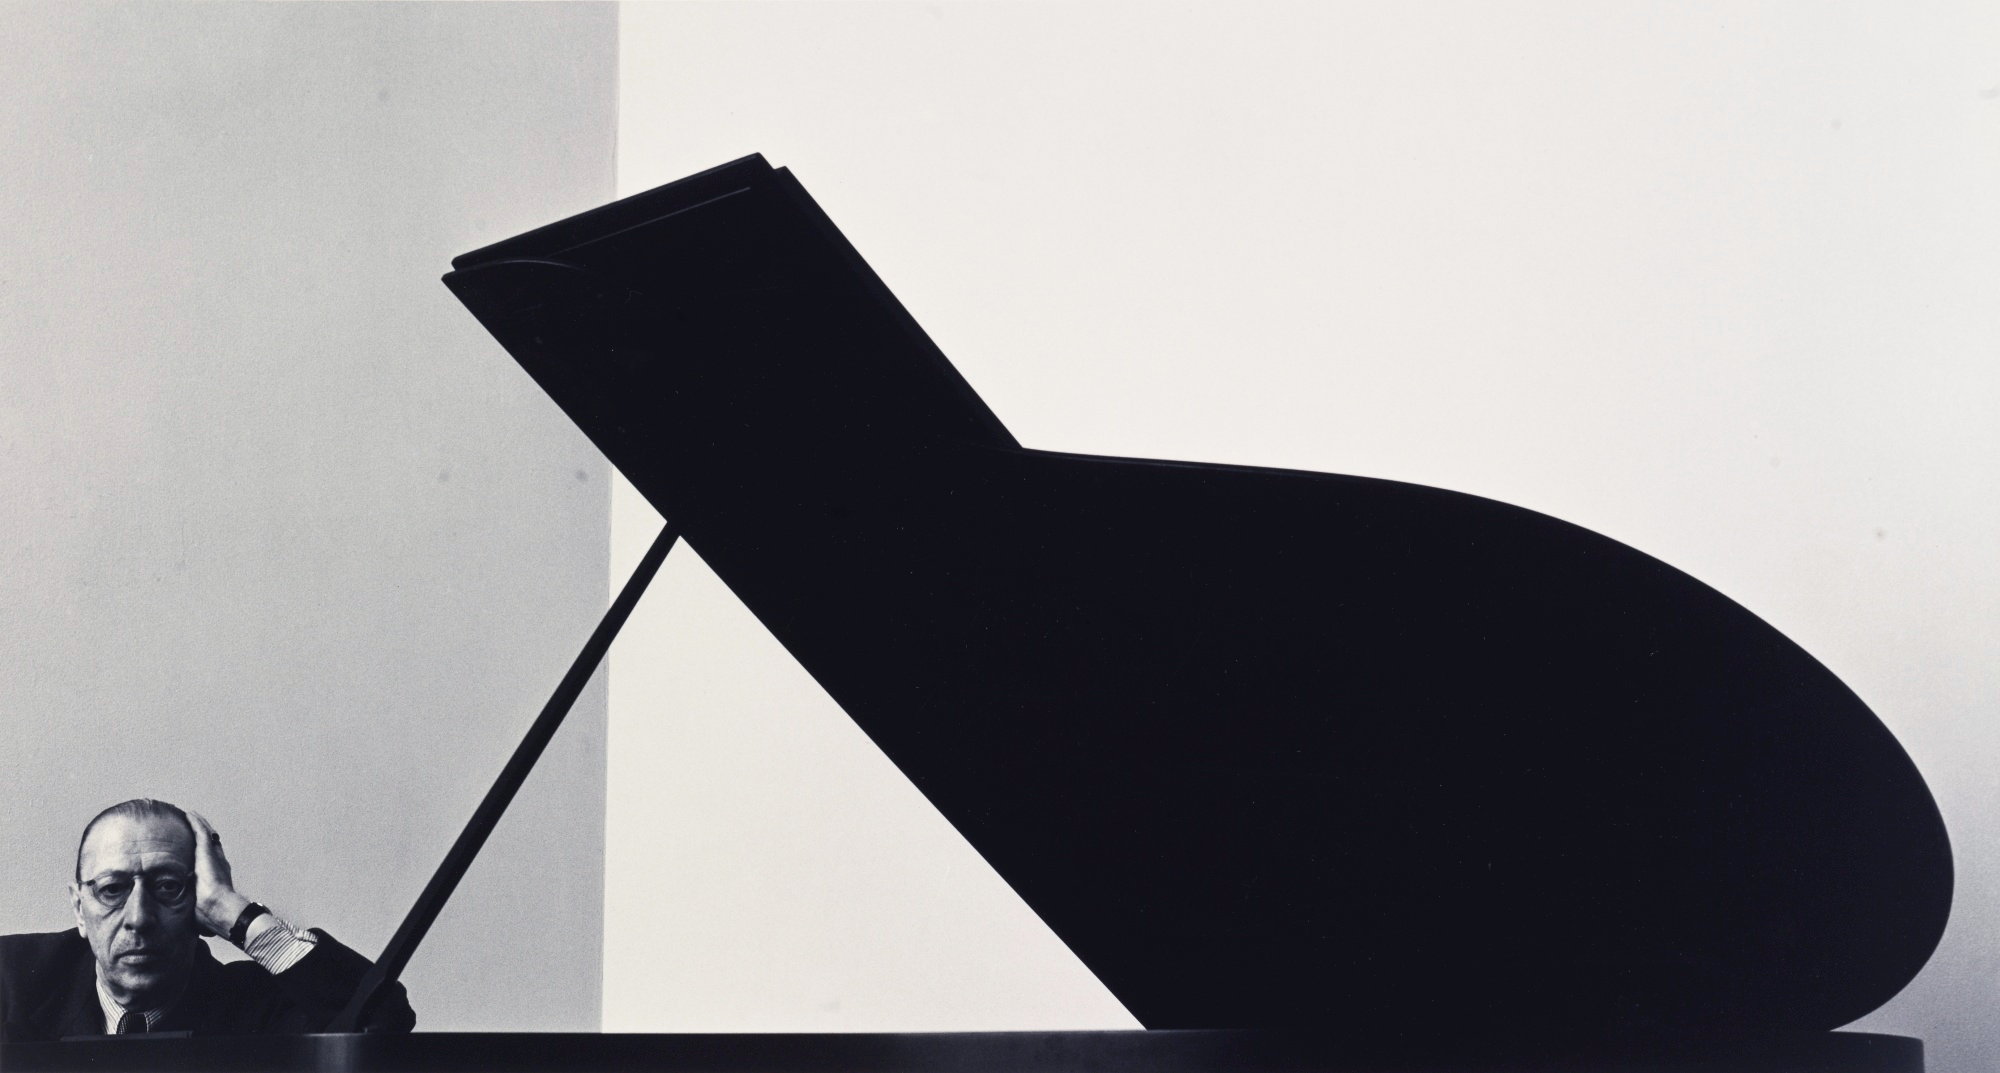
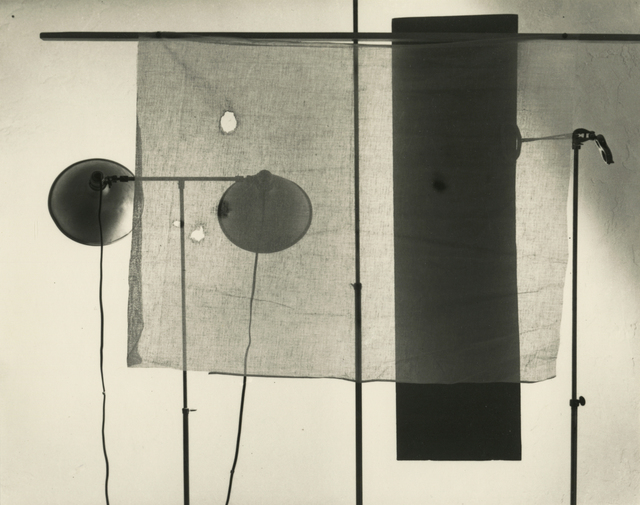
Arnold Newman 1918-2006
Newman was known as an environmental photographer, but, also for his abstract still life images.
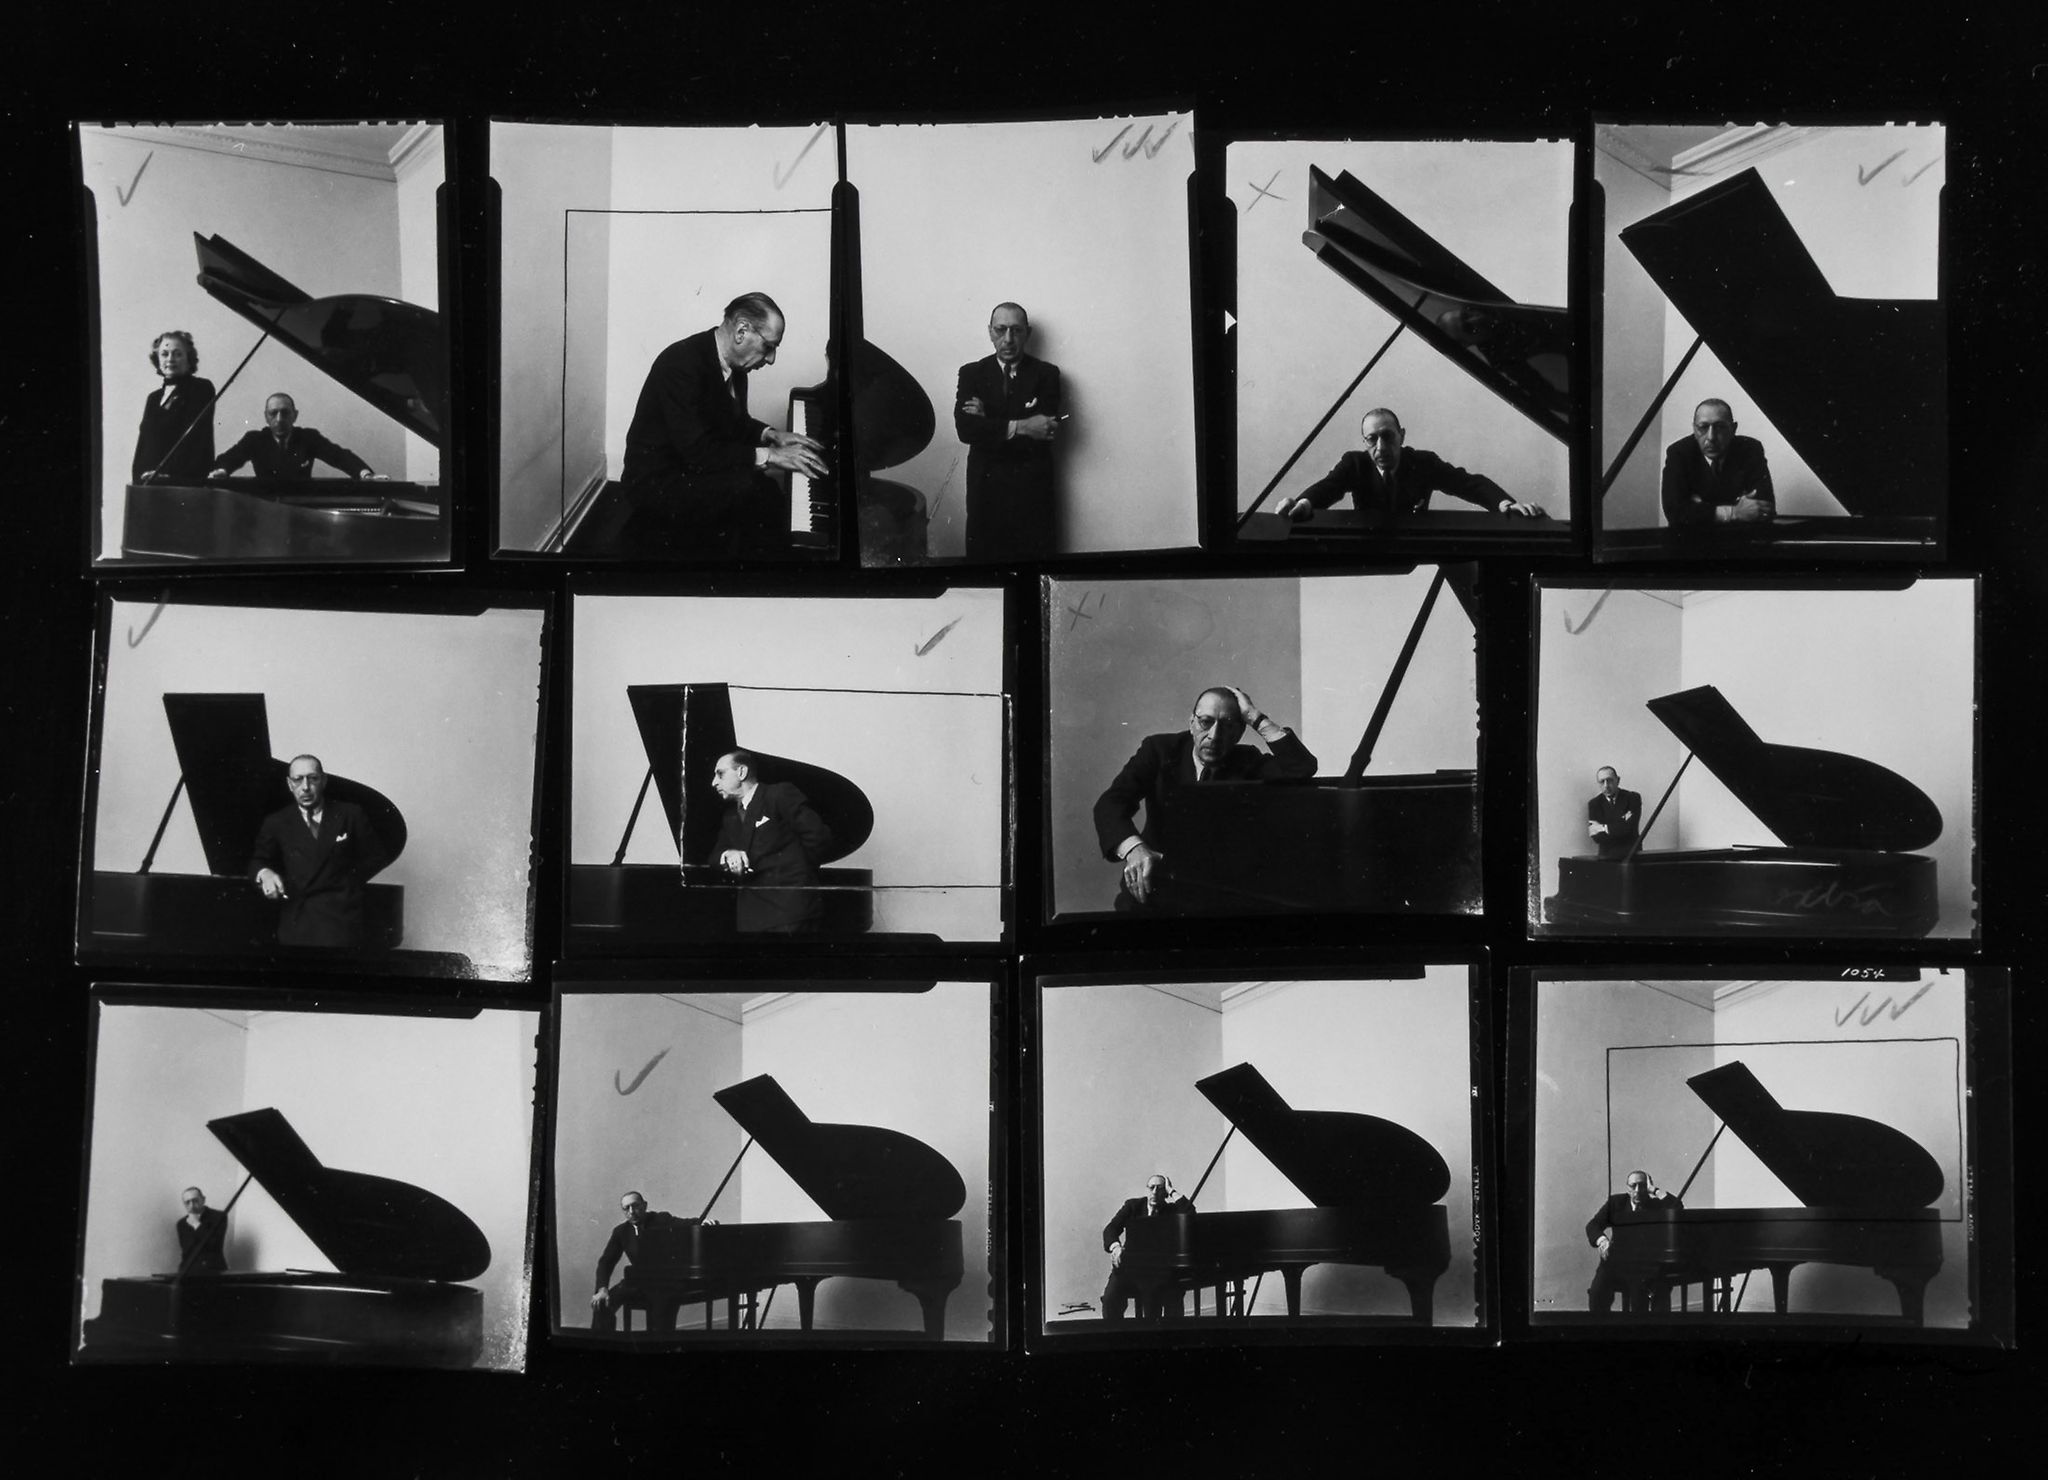
Newman's, Igor Stravinsky contact sheet
Final Pic.
Newman's more abstract photography "Studio Lights 1944"
_________________________________________________________________________________
_____________________________________________________________________________
Gin bottle product shot.

Studio lighting set up.
Strobes 1 and 2, elongated rectangular soft boxes with grids to direct light.
Strobe 3, a green gel covered light shining on to green background to create a rear green halo.
Strobe 4, an overhead light, with grid to highlight top of bottle cap and slate the the bottle is standing on.
Strobe 5, out of sight to the rear right, with a green gel and grid to creat green highlights on right side of bottle. This light is then moved over to the left to take another shot creating similar highlights on the left. These last two images can be layered in Photoshop to create the appearance that two rear lights were used at the same time.

Strobe 1 lighting left of bottle.

The addition of strobe 2 to light right side

Rear strobe 3 added to create rear green halo

Above strobe 4 added to light bottle top, shoulders and slate base

Rear strobe 5. First shot with strobe on rear left

__________________________________________________________________________________________________________________________________________________________________
C-41 developing is also recommended for some types of black and white film.
Below is the result of developing film type:-
Ilford XP2 Super 400
 Tetenal Colortec C-41 chemicals.
 Chemical Mixing Instructions
 Development procedure and timings


Lit by using directed light through a snoot


 Deeper dof. (f11)
 Flash too strong creating too much of a highlight on left of face.


Image using barn door reflector and creating a small slot of light.

 Shallow depth of field pics, adjusting flash power to suit exposure.
__________________________________________________________________________________________________________________________________________________________________
C-41 Colour print film developing
C-41 developing is also recommended for some types of black and white film.
Below is the result of developing film type:-
Ilford XP2 Super 400


A Jobo CPE 2 rotary developing tank

Stat set at 38 degrees centigrade, optimal for processing. Tank containing film in position being rotated mechanically.

Colour developer, once used can be returned to bottle for re use

Blix (bleach/fix) being returned to bottle after use

Collapsible bottle allow all the air to be removed before capping allowing for longer shelf life of chemical.

Processed film drying.
Digital Scans of the above processed films


__________________________________________________________________________________________________________________________________________________________________
Studio portrait using one light source

Strobe with standard reflector.

Strobe using reflective white lined umbrella.
______________________________________________________
Using one gridded soft-box as shown.


____________________________________________________
Using Standard reflector (centre)


Creating movement by turning head and releasing shutter at the optimal moment
__________________________________________________

Shallow depth of field, but focus point uncertain?

Focus point on nearest eye


Flash value reduced.

Casting light from left across face. Standard reflector

Turning head slightly produces better lighting that doesn't fall off as abruptly.

Photo shopped version of above photograph. Smoothing skin using frequency separation technique (to be added later). Also use of patch tool and spot removal tool to tidy hair lines and blemishes.
_____________________________________________________

Image using barn door reflector and creating a small slot of light.


__________________________________________________________________________________________________________________________________________________________________
Object: Create a photograph about food and drink


__________________________________________________________________________________________________________________________________________________________________
Food and drink Photographers
David Loftus
Kevin Summers

Robert Lawson, drinks photographer

JOHNNIE WALKER SWEET PEATOCTOBER 17, 2018

SEEDLIP – SPRITZOCTOBER 16, 2018
_________________________________________________________________________________
Still life through the ages and symbolism
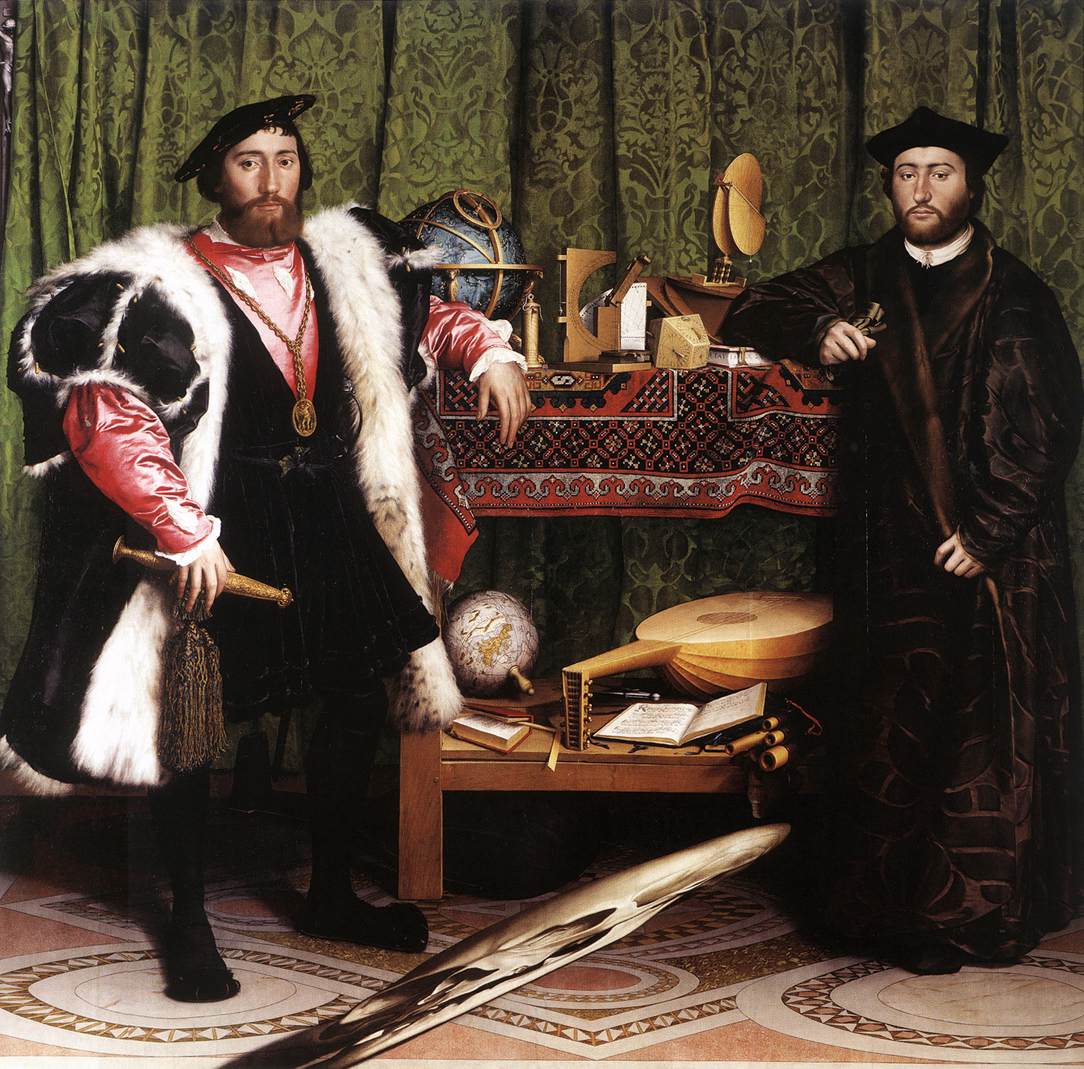
Holbein 'Ambassadors'
Note objects in the picture can be symbolic. Such as the book and musical instrument to symbolise culture. In the background we have a globe and instruments that seem to be connected to travel and exploration. In the foreground, Hobein has cleverly created an image of a skull that can be seen whole from an angle. This shows how an understanding of perspective is becoming more prevalent in paintings.

____________

Lobster in a nautilus cup. 1634
Jan Davidsz De Heem 1606-1684
De Heems still life is said to represent religious symbolism. Heem was noted for his skill at painting metallic and shining surfaces such as the pewter mug and the nautilus shell.
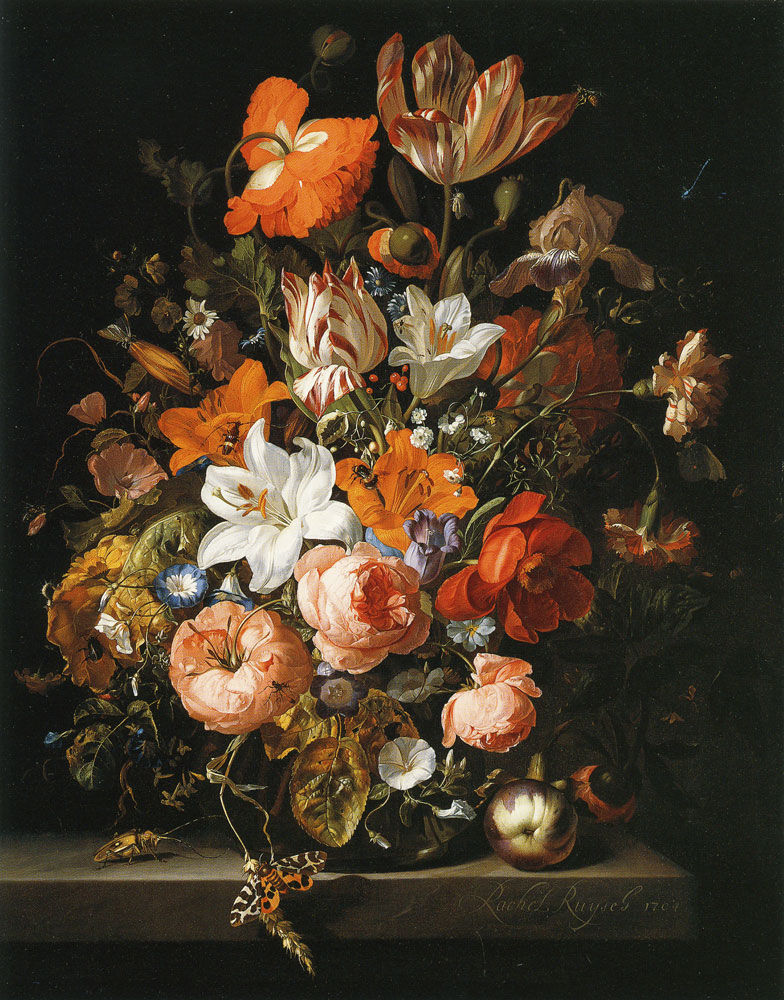
Still life Painting by Dutch artist Rachel Ruysch alongside John Blakemoore's photgraph of tulips
Taking the studio, out of the studio
At certain times, one has to take studio equipment into a situation where members of the public are present. It is important to adhere to all health and safety measures. All lighting stands and tripods must be positioned as to not create a trip hazard for passers by and the situation must be governed at all times.

In this case we are using one light stand and one camera tripod.

One strobe with fitted umbrella to dramatically soften the light reducing harsh shadows on the background. A banner on the right is used as a reflector to add a touch of fill light to the left.

This photograph is the result of metering the ambient light to keep the background exposed and then adjusting the flash power to expose the model without readjusting the camera settings.

In this photograph the camera was set to reduce all the ambient light by increasing the shutter speed. The flash power was then adjusted to correctly expose the model .


Same lit shot as above with the background being unconsidered. The one softened light giving effective detail on the face and nice light fall off.

Lit from above left adding texture to the face, using a service hatch shutter as an aesthetically pleasing backdrop. Note that the use of very diffused soft light, from the umbrella, creates a very soft shadow of the subject on the background. The banner as shown above reflects a bit of fill light to the right side of the photograph
_________________________________________________________________________________
Research methods brief. THE STUDIO PART
Task 2


 _________________________


Additonal shots in this category


_________________________________________________________________________________
Research methods brief. THE STUDIO PART
Task 2
Learning outcome 4
Your proposal should contain:
- A description of an event, situation or other piece of work that you wish to make work in response to
- Edward Weston 1886-1958
- "The camera should be used for a recording of life, for rendering the very substance and quintessence of the thing itself, whether it be polished steel or palpitating flesh."


(‘Edward Weston’s “Cabbage”, an Icon of Modernist Photography’, 2018) 1931
The majority of Weston's close up still life photographs were made in black and white, though he did use colour in his later landscape photography. Weston was a member of the f64 group in the early 1930's producing what was known as straight photography, creating high contrast photographs of what seems like mundane objects. The photograph of a simple cabbage, lit in such a fashion and photographed in the 'straight photography' style displays a large range of tonality, texture, shape and form, all key components of the formal qualities of art. Also note the deep depth of field as was the fashion of the F64 group Photographers.

(‘12 Great Photographs By Edward Weston’, 2017)
An explanation of what your work is about
As a response to Westons work this proposal will attempt to bring Westons work into the modern digital age, yet preserving the look, contrast and intent of the original photographs.
Weston was originally a Pictorialist, producing photographs that were akin to paintings but his association with Alfred Stieglitz gave him a more modernist approach to photography and he began to have a fascination with shapes and forms. Weston produced made many photographs of the humble cabbage which he developed a certain fascination for.
These photographs led him to be regarded as an icon of modernist photography.
A description of your research and practice methodologies that will allow you to
define the parameters of your project
A description of your research and practice methodologies that will allow you to
define the parameters of your project
It appears that the photograph of the cabbage leaf and the pepper were lit from above and there is evidence looking at the shadows that only one lights source was used. Westons pictures were taken with a large format camera and taken using relatively long exposures I hope to emulate the style by using a modern digital camera.
Discuss others work that will have an influence upon your own.
As we move into the modern age, black and white still life photographs are still being made, such as this flower by Joel Tjintjelaar
Discuss others work that will have an influence upon your own.
As we move into the modern age, black and white still life photographs are still being made, such as this flower by Joel Tjintjelaar

(Tjintjelaar, 2015)
Tjintjelaar's still life photograph could easily be labelled as a modernist and is not far removed from the high contrast F64 style of the late 1920's and 30's. It is a photograph of a simple subject, lit in such a way as to emphasise the shapes and contours of the petals in much the same way as the texture, shape and form are portrayed in Weston's cabbage leaves.
Keeping to this model, this project will produce black and white photographs as a tribute to Weston's style of photography.

Other High contrast photography is evident in this street photography shot by
Nico Goodden (https://www.nicholasgooddenphotography.co.uk)
In this photograph, Goodden says he was more interested in the lines and shapes rather than telling a story.
Describe what you hope to learn from this practical research project.
From this exercise a better understanding of using light to accentuate the shape and form of a still life object is hoped to be attained. To learn a better understanding of the use of continuous light rather a flash to create much softer shadows than a harsh flash.
Studio lighting set up to create Research brief photographs.

Overhead continuous light. Strobe to left. Speedlite fill to right

____________________________________________________

Flagged continuous light

_________________________
 ________________________

Flagged continuous light with white card and paper to bounce extra light onto left surface

An attempt to create the full tonal range as seen in Weston's original cabbage leaf
________________________

Continuous light with white card reflector too left. Mushroom suspended in mid air by use of a cocktail stick.

____________________________________________________________________
More pics from the shoot


Development Photographs from this shoot:-

Overexposed by too much continuous light creating harsh shadows

Lit from upper right front with white paper reflector for fill at the rear. Still too much hard light.

Toothpick pro and card surface. Ambient light soft shadow to right with hard light shadow to left. It was decided that using flash creates too much hard light and hard shadows.

Trying to adjust the light as to light the whole cut area leaving no shadow.

Original colour photograph before converting to black and white for the intended effect.

Overexposed first shot of mushroom showing supporting cocktail stick.

Improvement on light position.
__________________________________________________________________________________________________________________________________________________________________
STUDIO BRIEF 7TH MAY 2019 1-2pm


Learning Outcome 1: Use the department studio and specialist studio technology to create a portfolio of 10 photographs that reflect Level 4 learning.
The Photographs
Outcome 1
2 totally different, head and shoulders portraits of people using one light source


_________________________________________________________________________________
3 totally different, full length portraits of people using multiple light sources

_____________________________________________________________


______________________________________________________________


____________________________________________
_____________________________________
2 totally different still-life photographs using mixed lighting ie. Flash and continuous

This photograph, although taken using continuous light and flash, could have been made just using continuous light on its own or even flash on its own. Though the results may have been slightly different, there is no obvious use of the two different lighting methods.

The same would apply to this photograph.
The following photographs could not be done without the use of continuous a light and flash


_________________________________________________________________________________
3 totally different still-life photographs made using 35mm film and printed in the darkroom and scanned to be printed as an ink-jet photograph.


Additonal shots in this category


____________________________________________________
__________________________________________________________________________________________________________________________________________________________________
The Shoots and development for the above Photographs
2 totally different, head and shoulders portraits of people using one light source

The model is Charlotte Campbell, a 19yr old friend who works as an actor in a live event horror show, she has never modelled before.
This shot was taken using a gridded elongated soft box, set up vertically to the left of the Model as shown. One light source was used as in the brief instruction and no reflector was used, which can be seen as the right side of the face is totally in shade.
Safety for this photograph. Outcome 2
This shot involved one model and the photographer only, in the studio. A risk assessment and studio booking form was completed as shown below.

Studio booking form
_________________________________________________________________________________
ExposureTime - 1/160 seconds
FNumber - 10 This F setting provides enough depth of field to ensure the whole head of the model is in focus.
ExposureProgram - Manual control
ISOSpeedRatings - 100

This photograph of Zak, a fellow student, was taken in the universities refectory using an umbrella reflector and again, just one light source.
The single light source can be seen to be below Zak, and the camera angle was also set low down. To the right, one can see a banner. As the back of the banner is white, it acted as a reflector to cast light onto the right of the photograph, illuminating the shadows on the left side of Zak's face.
Safety for this photograph. Outcome 2
This photograph was taken in a public place so special care had to be taken to ensure the safety of, not only the model, but also people in the vicinity. A battery operated strobe was used which negated the need for any trailing power leads. The shoot was set up as to be in a location where any access could be easily monitored, for example, no entry from the rear of the shoot. The photographer also had an assistant monitoring any members of the public that may have encroached on the set up. The light stand was opened correctly to maximise its stability. The strobe was fired by a remote trigger on the camera so that there would be no trailing leads between the camera and the strobe itself.


Shot before adding corkscrew.
 Adding yellow gel to snoot to create below photograph
Holding a speedlite above to fill in a few shadows, (Not a good idea). It would be impossible to position the speed light in the same place each time a photograph was made. The correct procedure would be to fix the speedlite to a stand. This way, one would obtain more precise information of where the light falls and adjustments could be made accordingly.


Nikon FM2 T Using a 200mm f4 macro lens


 As you can see, the small mirrors are held in place using simple PlayDoh with the main light source actually behind the subject.


Below, 'Burning' technique. example


 If one hasn't got a Drying cabinet for the negatives, they can be hung up, preferably in a dust free atmosphere.

Man Ray’s “Solarizations”


Modern speedlites
Flash duration (the amount of time the flash is lit) up to 1/20000 sec.
THE LOWER THE FLASH POWER, THE FASTER THE FLASH DURATION

Modern strobe capable of a flash duration, (the amount of time the flash is lit) up to 1/8000th sec
___________________________________________________________________
____________________________________________________


__________________________________________________________________________________________________________________________________________________________________

The single light source can be seen to be below Zak, and the camera angle was also set low down. To the right, one can see a banner. As the back of the banner is white, it acted as a reflector to cast light onto the right of the photograph, illuminating the shadows on the left side of Zak's face.
Safety for this photograph. Outcome 2
This photograph was taken in a public place so special care had to be taken to ensure the safety of, not only the model, but also people in the vicinity. A battery operated strobe was used which negated the need for any trailing power leads. The shoot was set up as to be in a location where any access could be easily monitored, for example, no entry from the rear of the shoot. The photographer also had an assistant monitoring any members of the public that may have encroached on the set up. The light stand was opened correctly to maximise its stability. The strobe was fired by a remote trigger on the camera so that there would be no trailing leads between the camera and the strobe itself.
Development and additional shots for the head and shoulders section.


_________________________________________________________________________________
3 totally different, full length portraits of people using multiple light sources
ExposureTime - 1 seconds
FNumber - 16
ExposureProgram - Manual control
ISOSpeedRatings - 100
This is an attempt to recreate this photograph by professional photographer Phillip McCordell

Phillip McCordell's photograph.
https://youtu.be/XyGa7z4GQ2U
Using a long exposure of one second, we are able to capture the movement of the model due to the continuous lighting. Then, a 'Rear Curtain' flash exposes the model, freezing the movement at the end of exposure.


I used two elongated soft boxes with fitted grids, to reduce the spread of light, slightly to the rear to outline the model. Using this set up with no illumination at the front I made the following photograph.


This photograph, although taken using continuous light and flash, could have been made just using continuous light on its own or even flash on its own. Though the results may have been slightly different, there is no obvious use of the two different lighting methods.
The lighting was a simple set up using a continuous light source and a snooted flash to create a light spot to the right edge of the cheese board.
ExposureTime - 1/100 seconds
A brief explanation of REAR CURTAIN FLASH
When using a flash, the actual flash of light produced by a strobe, or speed lite has to be in synchronisation (sync) with the cameras shutter. This means that the shutter has to be fully open when the flash fires, so as to expose the whole frame to the light.
Consider a shutter that has two curtains. Curtain one covers the film or sensor blocking the light from making an exposure. When the shutter 'release' is pressed (so called as older cameras had a mechanical shutter which was primed by the film wind on button, and the spring loaded mechanism would be 'released' by the press of the shutter button), curtain one fully opens, the flash fires, and then curtain two closes. Usually the flash will fire as soon as the first curtain fully opens, exposing the sensor, or film to the flash, regardless of how long the exposure is.
When rear curtain flash is selected in the cameras menu, the flash will not fire when the first curtain opens regardless of the set exposure length. Instead the flash will fire at the end of the exposure time just before the rear curtain closes, hence, 'rear curtain flash.
Safety for this photograph. Outcome 2
Only the photographer and model were present for this shoot. The above risk assessment had been filled in and steps were taken to ensure the models safety. Because this shot required movement of the model from A to B over a period of one second it was necessary to make sure there were no trailing leads or objects in her path. The lights and power leads were to the extreme left and right behind the models path and posed no trip hazard. The model is a trained dancer, and is likely to have better, practised, balance, which is safer than asking a novice to perform the same movements.
Development shots for the above photograph

To pre focus the shot, the model was asked to stand at the point she would arrive at, at the end of her movement. The focus, set in manual, and fixed, would ensure a sharp image when the rear curtain flash operates. An aperture of f16 also creates a deep depth of field as to provide more leeway.

A few practice shots. To the right there are two CONTINUOUS lights that are shaded from the back drop and the camera by large black shields.
Below, the original practice shots


The biggest challenge was trying to get the shot in the space available. The movement was restricted and if the backdrop was at least double the width it would have given the model more free space to move into. Some of the shots.

For example, the above shot shows the white fabric exceeding the bounds of the backdrop. After experimenting we managed to make some photographs within its limitations. The photograph we were trying to emulate by Mr Cordell, was taken using a much wider backdrop.
________________________________________________________________

I decided as the model clothes were not at all colourful, this photograph was more suited to black and white. The lighting on the legs is actually different on each leg and it would have been a better shot to make them more even, by moving the light boxes.. The floor and infinity curve need another coat of paint as the marks make the photo look very scruffy. Some of the bigger marks could be photoshopped out, but to smooth out all of the background would be a mammoth task.

With the two side lights still in place an additional soft box was placed above, and in front of the model as shown

This softbox at the front had its power adjusted to fill the shadows on the front of the model. If this was too bright it would probably take away any texture created by the side lights and would result in a 'flat' image. Two large panels were placed so as to shield the camera from any spill light which may emanate from the two side soft boxes.

With the same lighting set up the models legs have been slightly highlighted to make them more three dimensional. This also applies to the highlights on the shoes. Once again, the floor of the studio was very marked and I decided to clean up some of the worse scratches and scrapes in Photoshop. I also removed the labels that were still on the soles of the shoes as they were stuck firm.


This photograph was taken from an angle and distance which also showed the carpeted floor of the studio and the ceiling. This photograph, being digital, can be cropped in Photoshop. As below.

The point being, if the shot was framed like this in the first placer, then post cropping would not have been necessary. Though even in the days of film, cropping was still an option. For example:-
This noted photograph By Arnold Newman of Igor Stravinsky was cropped from the below contact sheet, bottom row, third from left, where you can also see the studio ceiling and what looks like a music stand on the floor.
The actual crop:-

_____________________________________________
Framing

After considering the fact that other extraneous objects can sometimes make their way into photographs decided to purposely do so. I wanted to show the studio environment in a subtle way. I have purposely cut three corners with a studio light, the ceiling and the floor carpet.
In terms of composition, this photograph would be an example of 'framing'

A photograph of model Jerry hall taken for the Marie Claire magazine found after my photograph was made, shows that its all been done before?
_______________________________________

This picture was taken using the one elongated softbox to the left and a snoot to cast light on the models face as shown below:-

I found, that though the snoot was acceptable, the softbox was set to too high creating unwanted highlights on the models raised right hand and the right side of her face.
_________________________________________________________________________

I started with an elogated gridded soft box on either side of the model and also added an overhead softbox to try and add some light to the model's jet black hair.

The left and right softboxes are clearly evident on the model arm and dress, though the darkness of the hair is still causing problems.


I added a snoot to ad some light to the underside of the models hair and to cast some light onto her face.


I reduced the power on the right hand softbox to reduce what I have come to call, the sandwich effect (maybe it will catch on). The snoot did its job to add light to the face.

In this photograph, though the snoot did its job on the models face but also caused an unwanted harsh shadow of the models hand on her dress.

This photograph used the same lighting as above but with reduced power in both left and right strobes. This led to the 'rim' lighting being minimised, and maybe making the dress look a little 'flat'. I did add a small vignette in Lightroom. Probably a symptom of looking at a flat image and feeling it needed something. Not really well lit in my opinion.
Rim Lighting
Rim lighting, sometimes referred to as back light, is light placed on your subject which gives the appearance of an outline or emphasises an edge to give the object more of a three dimensional look, e.g


To attempt to soften the light further, I turned both light boxes onto the white reflective surfaces as shown and made some photographs using this set up


I mistake in not noticing the models clothes going slightly out of shot.
The studio floor ?

All these pictures have had the studio floor cleaned up in Photoshop, as there were many scrapes, dirty marks and scuffs which have no bearing on the photograph and were unsightly.

The original photograph showing the studio floor.
_________________________________________________________________________________
2 totally different still-life photographs using mixed lighting ie. Flash and continuous
This photograph, although taken using continuous light and flash, could have been made just using continuous light on its own or even flash on its own. Though the results may have been slightly different, there is no obvious use of the two different lighting methods.
The lighting was a simple set up using a continuous light source and a snooted flash to create a light spot to the right edge of the cheese board.
ExposureTime - 1/100 seconds
FNumber - 13
ExposureProgram - Manual control
ISOSpeedRatings - 100
This set up was inspired by the Food photographer, Daren Kemper
https://www.darrenkemper.com/

Darren Kemper
I took the idea of a board with a variety of cheeses and red wine and a few extra condiments of sorts from various food photographers, for example the photography by Kemper. The lighting was a simple set up using a continuous light source and a snooted flash to create a light spot to the right edge of the cheese board.
Safety for this photograph. Outcome 2
Safety was a minor issue for this shoot. It was a self contained shoot with only the photographer present. All the strobes were battery operated and fired from the camera remote. If anything, that knife was extremely sharp.
Development shots for the above photograph

Original set up

Shot before adding corkscrew.

Holding a speedlite above to fill in a few shadows, (Not a good idea). It would be impossible to position the speed light in the same place each time a photograph was made. The correct procedure would be to fix the speedlite to a stand. This way, one would obtain more precise information of where the light falls and adjustments could be made accordingly.

The effect of the yellow gel can be clearly seen. The use of red wine created huge reflections in the glasses of the cheeseboard layout. Once seen, impossible to unsee and i assume would be tricky to avoid.
_________________________________________________________________________________
Still life picture utilising constant light from the left and a snooted flash on the right to emphasise the pile of books. Like the above photography, no obvious use of continuous light and flash light is apparent.
Development shots for the above photograph


Safety for this photograph. Outcome 2
Safety was a minor issue for this shoot. It was a self contained shoot with only the photographer present. All the strobes were battery operated and fired from the camera remote.
_________________________________________________________________________________
The following photographs could not be made without the use of continuous light 'and' flash
Created by dropping the 'bear' through an illuminated area into a dark area over 1/4 sec. Also using rear curtain flash (see above for rear curtain flash explanation), where the flash fires at the end of the exposure to capture the bears sharp image.
_______________________

Single feather dropped using multi flash. This is where the flash is set to fire a consecutive number of times in short succession. In the above photo, as the feather floated down, the flash fired seven times. A continuous light illuminated the left rear of the image to give some illusion of depth rather than a totally black background. The feather was dropped through a dark area which prevents the background showing through the exposed feather.
A handful of parrot feathers using the same method as above.
Set up for above pictures f10 (a depth of field to cover focus on the feathers from front to back) 0.5 sec

The two snooted strobes were set to multi flash 7 times within the 0.5 second exposure of the camera. The feathers were dropped through the field of light at the same time as the shutter was operated. The shutter was operated by a remote trigger to make the timing of the shutter and feather release less problematic as one didn't have to have one hand on the camera. The focus was pre set to where the feathers would fall and the aperture was set around f10 to give a depth of field deep enough to allow for where the feathers would fall.
_________________________________________________________________________________
3 totally different still-life photographs made using 35mm film and printed in the darkroom and scanned to be printed as an ink-jet photograph.


Nikon FM2 T Using a 200mm f4 macro lens
Pixa pro flash trigger wirelessly controlling and adjusting flash


____________________________________________
35mm film additional shots

A hand addition to a small studio set up to re direct light to certain areas of the subject


Resulting in this photograph below

________________________________________________

The model is made from thin sheets of steel so i chose a tinfoil base to match the texrture of the metalwork. A small mirror,set in Play-Doh, redirects light to highlight the front of the model resulting in the below photograph
Further photographs showing the use of small mirrors.


____________________________________________
Scanning Negatives for the PC
Above is a Scanner specifically designed for scanning film negatives of various formats. We will use the 35mm template.
Load negatives into the scanner tray, taking note of the orientation of the negative strip as shown by the indicative illustration on the plastic frame itself.
Close the scanner lid, open the scanner programme and after making sure the correct film type is selected, click on the preview button.
Once the preview screen is active, select the frames to be scanned and input the correct output settings following the guide below, as in this case, to produce a scanned image that will be able to be printed on a 10 x 8 photo paper.
Obtaining the prints
First the colour enlarger was set to give a satisfactory contrast to the exposure using the settings as illustrated here.


The contrast was set at grade 3 and the magenta and yellow dials were set as indicated.
The printing procedure was undertaken as follows:-
Printing a Contact sheet
First we need a frame to hold the negatives


Contact sheet for above scanned prints.
Six negative strips can be placed on the glass hinged cover of the frame.
NOTE...at this point, because we are about to bring the photographic paper out of its light proof box, we turn off the lights and switch on safe lights which cover a part of the spectrum that we can see but the photographic paper is insensitive to. Return the unused photographic sheets to their lightproof bag
The photographic paper is laid inside the frame emulsion side up and when the frame is closed the negatives, that are inserted into the frames glass cover, will sit flat against the paper. Make sure the negatives are emulsion side down when the frame is closed, so that the prints will be the right way around.
Place the frame under the 'Enlarger' so that we are ready to expose the whole assembly to a measured amount of light, therefore exposing the paper to the light passing through the negatives. The light intensity can be adjusted to shorten or extend the exposure time.
Enlarger
With the frame in place we can take a piece of black card and cover the loaded negative but leave a small strip of the negatives uncovered. Switch on light and expose for (suggested) 4 seconds. Move the card to expose a further strip of unexposed frame. and expose for a further 4 seconds. This in effect will mean the first uncovered strip open to the light will now have accumulated 8 seconds of exposure time. Carry on moving the card at 4 second intervals until the whole frame has been exposed.
Focus finder
This piece of equipment is placed on the enlarger table on top of where the photo paper will be placed. Looking through the lens, the focus wheel on the enlarger is adjusted until a sharp focus can be seen in the focus finders small mirror, by looking at the grains on the negative which has been inserted for enlarging. Once done, it can be removed and the lights turned off to expose the print paper as normal.
The light path to the eye from the enlarger bulb is the same optical distance as the light path from the bulb to the photo paper.
Developing a Print
The lights remain out and the safe lights remain on as we remove the photographic paper and place it in a prepared tray containing an inch or so of developing fluid.
Develop for one minute while slightly agitating tray.
Remove and place paper in a tray of water for around 30 seconds with slight agitation.
Remove and place paper in a third tray containing fixer for approx 1 minute, with slight agitation.
You may now turn on the main lights and remove the photographic paper from the fix and put into bath of room temp water to wash off the chemicals. Remove and dry flat.
The finished print will have stripes at various times of exposure. We expect a series from a light exposure to a longer dark exposure. From here we can pick a suitable exposure time to develop the full contact sheet. Follow the above procedure without using any black card, and expose the whole sheet to the rows of negatives.. Follow above developing method to produce full contact sheet.
Develop one print
Insert one negative strip into the enlarger, so that one frame is projected onto the bed where the photographic paper is to be laid.
Once more, turn out the lights
Focus and adjust light and contrast to obtain an estimate of exposure length.
Turn off the enlarger light and take a piece of photo paper, resealing the rest and place the paper, emulsion side up under the enlarger.
Expose in the same way using the same black card 'exposure strip' method as we did with the contact sheet. Here we can see the strip produced after developing.
To the right, a 10 second exposure, and then a series of 20 sec, 30sec etc.
Choose best exposure time. Here, around 35 secs.
Repeat process to expose full frame for chosen time and develop to obtain final picture.
Print.
________________________________________________

A simple light source was set up to photograph these orchids.
Dodging and Burning
Below, 'Burning' technique. example

These two images show how the use of Dodging and Burning can alter the exposure of certain parts of the image.
The first print developed was as below:-

It was noted that on a 30 second exposure, after developing the print that the orchids on the right were a little over exposed. To correct this we used a method known as burning. It is noted that the more light the photographic paper is exposed to, then the darker the image will be.
In this print, the timer was set to 35 seconds. After 30 seconds, the orchids on the left were shielded from the light by moving my hand over that part of the image and 'moving' it around so as to blur any obvious transition between the different exposure areas. Basically this means the orchids on the right received an extra 5 second exposure making them noticeably darker giving a better appearance.
Dodging is preventing light from reaching the photo paper using a shield as above. Burning is when more light is added to an area to increase the exposure.
____________________________________________
Dry Equipment

Meticulously drying equipment after. Any hint of moisture on the reels will make it impossible to wind on undeveloped film as it will just stick in the spiral

Exposing for print in the darkroom

This shows a print where light has filtered through onto the paper before developing, creating the black edges on the paper

The white areas are over exposed here, but unfortunately over exposed on the negative, so there is no detail that can be obtained by reducing exposure time at the print stage

A high contrast print. I am very satisfied with the outcome of this print. The contrast was gained by using the settings on the enlarger.


To get a satisfactory contrast i first set the Magenta and Yellow dial to Grade 2, Y45, M24.
This proved to be insufficient so the shot of the Nikon lens was evetually exposed onto the paper at the Grade 3.5 setting with the appropriate Y and M values, dialled in.

The exposure timing were done in the usual way as explained above. The biggest thing to notice here is the developed print on the left. Even at the correct contrast setting, the developed strip was very low contrast and had a very flat look to it. This was a result of the developer being old or overused, so I made a fresh batch. The strip in the right was developed using the fresh batch and even using the same contrast settings, it is clear that a sharper, clearer print has been obtained.
A 1 litre bottle of a 10% developer solution is suitable to make 1000 resin coated prints.

Man Ray’s “Solarisations”

Primat de la Matiere sur la pensee,
Man Ray’s “Solarizations”
During the developing process, Man Ray would momentarily flicker his studio lights, forming that distinctive inverse of tones around in his subjects.
_________________________________
_________________________________
Instead of momentarily flicking on the studio lights i used a modern speedlite to 'flash' the paper.
There a re basically three variables at work. The length of exposure, the time the paper is in the development bath before removing it to 'flash' then return to developing, and the intensity of the flash itself.
Three attempts were made at different setting.
All exposures were the same time

Develop 30 seconds, remove, flash then return to develop for further 30 seconds

Develop 20 seconds, remove, flash then return to develop for further 40 seconds

Develop 5 seconds, remove, flash then return to develop for further 55 seconds.
This produced the best result.
_________________________________________________________________________________
Learning Outcome 4: Describe in meticulous detail the steps you have utilised in the management of the image files created for this module, from downloading, re-naming saving and backing up.
Adobe Lightroom
All the photographs for the studio brief are dated labelled and catalogued using Adobe Lightroom, which has an extensive and multilayered cataloguing system.
First, a catalogue is created within Lightroom which in turn creates a folder on the hard drive.

The above screen grab shows the folder structure for one particular shoot. In this case, the pictures of young Charlotte. All the pictures from this shoot are independent of any other shoot and the actual raw format photographs themselves are located in the Library folder which can be seen within this catalogue folder.
Inside Lightroom the photographs are presented as shown below.

Down the left side of the screen shot are the folder tree's. Folders can be added here. For this shoot there is the root folder, containing all the photographs plus added folders where individual shots can be moved to. Lightroom also has 'smart collections' where a folder can be made to automatically add photographs to, for any given criteria, such as, raw, jpeg, cropped, edited or any particular date or period.

Within Lightroom, all photographs are automatically labelled with the date and time and all the relevant camera settings. The photographs can also be 'keyworded' as you can see in the above screen grab on the right. Any keyword tags are saved in the 'metadata' which is attached to the image file. Searching any keyword will instantly bring up any photographs who's metadata contains that keyword 'tag'.
Exporting from Lightroom
After any editing has been done and the photographs have been selected as the final product, the photographs can be exported as standard jpeg files, to be printed or distributed to customers as digital files.
In the case of the Studio Brief, any exported pictures are placed in folders labelled as the brief requires.


Back up


To make the stand more sturdy, one can attach sand bags around the base.

In the case of the Studio Brief, any exported pictures are placed in folders labelled as the brief requires.

Within each folder are the final exported photographs for the brief plus a folder with development shots for that particular section.

It is important to know that all the dates and times and the main bulk of any shoot are all contained within the Lightroom catalogue. Any photographs required at a later date can be exported from the relevent lightroom catalogue.
From the camera to the final storage.
Camera with one CEF card slot and one SD card slot
Cameras with two card slots can be set, so that the second card makes an identical backup copy of the primary card every time a photograph is taken. It is recommended on a shoot to replace the back up card, or the single card, (in a one card camera), every hour or so in case the card card 'fails'.
Always fully format any card 'in camera' before a shoot, and never use the camera to delete individual pictures as this risks causing the card to become corrupt.
It is always better to remove a card, from the camera, and insert it into the computer to transfer picture files to your photo editor or desktop, as a data lead could lead to programme corruption in the camera software..
Label all files with dates, names and locations and keep in individual labelled folders.
It is advised to make identical copies of these folders, be it on external hard drives, cloud services, or both. Or indeed, two identical external hard drives.
When exporting files from Lightroom for a customer, it is suggested that you could provide the customer with one folder of photographs for printing and another folder of photographs displaying your logo, and or, watermark; asking if, when they share photographs, they would share the labelled copies to further your recognition and customer base..
After a period of, for example, one month, It is suggested that if you have used two external hard drives to back up your photographs, you could label them with the appropriate dates and store them indefinitely together as master and slave, purchasing two more hard drives for future use.
RAID 10 SAFE BACK UP SYSTEM
Another method of safe storage is the RAID system, where 4 drives are required. Any drive that fails can be replaced and the new drive will be populated by the other three. This is a very safe internal method of storing data.
Raid 10 system.
My own personal 4 x 1 TB Hard drive RAID 10 system.
This system however does not protect photographs from fire or theft so an identical copy of all the catalogues and exported photographs for the Studio Brief are copied to an external hard drive and also to cloud storage.

External HDD containing all catalogues and image files.
_________________________________________________________________
Learning Outcome 2: Document extensively, on a blog and/or in a visual notebook, the issues concerning the risks and safe working practices within a photographic studio. Relate safe working practices directly to your own photographic studio production for this module.
OVERALL
When using studio equipment, it is important to take health and safety into consideration. Equipment must be used correctly and in a way that will not cause injury to other people working in the studio environment.
Examples of safety practices.
Power and other cables are a main cause of trip hazards in a studio. Leads should be taped to the floor to prevent the possibility of a person tripping and causing injury.

Equipment must not be left lying around on the floor causing trip hazards and at the end of any session, all equipment must be put back in its designated space.
Lighting stands must be erected and used correctly:-
Incorrect
Correct
To make the stand more sturdy, one can attach sand bags around the base.
Strobes, unlike speedlites have a modelling bulb as a source of constant light, as well
the flash bulb. The modelling light can become very hot and should be left to cool down after use
before fitting the plastic protective cover, or the above result could occur. Also careful handling is required to prevent burns.
ALL FLASHES MUST BE DISCHARGED BEFORE STORING
35mm film images and safe storage

Film, once developed can be cut into strips of six and carefully placed into custom made folders. Labelled with times date shoots and any other relevant information. For the purpose of this brief, the negatives have been labelled accordingly and stored as shown below.

Print made from the negatives in the darkroom should be safely stored away out of proximity to the negatives as chemicals arising from the negatives can still affect the photo paper
__________________________________________________
Learning Outcome 3: See the historical impact of the photographic studio environment and make connections between others working methods and your own
The first studio were designed to be used by painters who would set up a studio with a north facing window to maximise the use of daylight.

A typical artist studio Painted by 17th century Flemish artist Joos Van Craesbeeck.
Note the large window, as lighting in a studio was yet to be a consideration. By the mid 19th century the photography studio was being developed, but even so as in the below photography, the light was still mainly obtained from large north facing windows.

Stafhell and Kleingrothe studio in 1898
Stafhell was a Swedish photographer who entered into a partnership with German photographer, Carl J Kleingrothe .
.
.
The first electrically lit studio's came about using arc lamps around 1877, though Nadar is said to have photographed the sewers in Paris using battery operated lighting. in the 1860's

Felix Nadar. Paris sewers 1861
Dutch photographer Henry Van Der Weyde was considered to be a pioneer of the electrically lit studio. He made use of a gas powered dynamo to power is electric lights.
As more light sensitive chemicals were produced and photo media moved from glass to celluloid, then the lighting methods also changed. By the 1940's Studio lighting had taken the form of large, very hot, tungsten lamps.

1940's photography studio
By the 1960's the era of the modern Photography studio was well and truly formed with modern flash lights and strobes and many light modifiers. The photographer could now use light in a controlled enviroment.
The use of modern photographic equipment in a studio enabled

Professional Photographer David Bailey surrounded by studio lighting equipment
back in 1965 in the 'Vogue: studio, Hanover square.
Studios have now become a major asset to a photographer and many are very similar with an array of backdrops and usually an infinity curve. This enable a photographer to create many photographic scenarios that can be emulated by the photography student who can access a studio environment. This is evident in the studio full length shot which was an attempt to reproduce Phillip McCordell's photograph in this previously mentioned example
__________________________________________________________
Above, a huge example of an infinity curve at the rear of the studio which stops shadows from forming on hard edges in the background. This can produce images which look as though the subject is isolated, in the above case, on a pure white background.
How Flash Photography Developed
The first chemical emulsions were very insensitive which lead to a search for a better light source. This took the form of continuous light and early attempts at flash using ignitable substances such as magnesium to produce an 'Open Flash'
Open Flash
This is where the shutter is opened, the flash is triggered, and then the shutter is closed. There was no flash sync in those days.

A Flash Pan in use, where the flash powder would be spread in a metal channel and ignited.

Photographers flash pan.
Originally ignited manually by the photographer, this method was dangerous and was known to have caused many injury's.. Around 1899, a safer method was invented to ignite the powder using an electrical spark induced by a dry cell battery.
It was 1927 before the 'flash bulbs' were invented. They were originally made of glass and then later, plastic.
Later, flash bulbs became as multi disposable units.
Eventually, the modern Flash units were invented as we use them today in the form of speedlites and strobes.
Modern speedlites
Flash duration (the amount of time the flash is lit) up to 1/20000 sec.
THE LOWER THE FLASH POWER, THE FASTER THE FLASH DURATION
Modern strobe capable of a flash duration, (the amount of time the flash is lit) up to 1/8000th sec
___________________________________________________________________
____________________________________________________
Retouching Black and White Prints

Start with all necessary equipment on a clean surface.

Print with small white marks created by dust or other fibres on the negative before exposing the negative to light. Small white dots can be seen on the left of the above image.

The spot all colour kit that contains the pigments to camouflage the white spots.


A small drop of the pigment is enough to retouch a whole print.
Notice the water present in the saucer to dilute the pigment.

Use very fine brushes that can be shaped to a small point.

A tiny amount of pigment can be mixed with the water to create the shade of grey required for the touch up process.

Mask of the part of the photograph that is not being worked on to protect the surface from any contamination, especially grease off ones hands that could create a barrier to the touch up fluid.

Apply the pigment using a stippling (dabbing) motion starting with a very faint mix. Let the layers dry and build them up to the right shade as to hide the white spots. This work has to be precise and meticulous as it would be impossible to make the spot area's lighter again if too much pigment is applied.
NHCC Professor Will Agar's youtube video with a demo of Photograph retouching.
_______________________________________________________________________________________________________________________________________
_______________________________
Contemporary Photography
Susan Fenton


__________________________________________________________________________________________________________________________________________________________________
Chloe Dewe Mathews
Juliya Burvinyova travelled 1000 miles from Moscow to receive the Naftalan treatment. She is one of a growing number of young Russians, who soak in oil for it’s cosmetic benefits. During the fifties, the Naftalan treatment was identified by the Soviets as a potential holiday resort. They built 2,500 capacity sanatoriums, and by the late eighties, 75,000 people were being treated each year, with free flights offered by the Soviet government. From Caspian © Chloe Dewe Mathews


____________________________________________________________________________________________________________________________________________________________________________________
Corrine Day
(19 February 1962 – 27 August 2010) was a British fashion photographer, documentary photographer, and fashion model.
Kate Moss
As One of Kate Moss's best friends, Day took many photographs of her. At one stage they even lived together.
__________________________________________________________________________________________________________________________________________________________________
Sam Taylor-Johnson Wood

Escape Artist (Green & Red) 2010
English filmmaker and photographer. . She is one of a group of artists known as the Young British Artists.
__________________________________________________________________________________________________________________________________________________________________
Navad Kander
Projection
Nadav Kander is a London-based photographer, artist and director, known for his portraiture and landscapes. Kander has produced a number of books and had his work exhibited widely. He received an Honorary Fellowship from the Royal Photographic Society in 2015, won the Prix Pictet and a World Press Photo award.
____________________________________________________________________________________________________________________________________________________________________________________
Brian Griffin
Portrait of Madonna, taken in Iceland for a project for Reykjavik Energy called 'The Water People' (2006)
Born in Birmingham in 1948, Brian Griffin is one of England’s most influential and creative portrait photographers. Brian also started to work with a huge variety of music industry clients including Depeche Mode, REM, Elvis Costello, Iggy Pop, Ringo Starr, Peter Gabriel and Queen's Brian May.

______________________________________________________________________________________________________________________________________________________________________
Madame Periptie
Madame Peripetie aka Sylwana Zybura is a photographer and linguist based in Germany and UK working internationally on diverse art projects and for various independent magazines. She explores the boundaries between fashion, sculpture and the human body, experimenting with various fabrics and patterns; whilst infusing high fashion elements with abstract and conceptual ideas, creating an eccentric escapade of colour and texture. In her work she is focusing on character design and it’s influence on modern fashion photography. Her inspirations include surrealism, dadaism as well as postmodernism (the new wave era of the 80s) and the avant-garde theater of Robert Wilson.
What it does'nt mention in the above write up is the obvious amount of Post Processing that has been used to create these images

____________________________________________________________________________________________________________________________________________________________________________________
Alex Burdine Lazursky
Another photographer making extensive use of Post Processing.
________________________________________________________________
___________________________________________
________________________________________________________________
___________________________________________
No comments:
Post a Comment